
Weddings are extraordinary events that bring together loved ones to celebrate the union of two souls. However, the costs associated with these celebrations can quickly add up, leaving couples searching for ways to save money without compromising the overall experience. One area where significant savings can be found is in the realm of wedding invitations. The question arises: should couples opt for do-it-yourself (DIY) wedding invitations or invest in professional services? A socio-textual analysis of written wedding invitations in Jordanian society highlights the cultural significance and social dimensions reflected in these invitation cards. This article delves into the pros and cons of both approaches, providing insights that will guide you in making an informed decision.


Why Does My Charger Keep Going on and Off?

Have you ever plugged in your phone, only to see the charging indicator flicker on and off repeatedly? This frustrating scenario can leave you with a dead battery and a surge of annoyance. According to a study guide on hardware and network troubleshooting, a flickering screen on mobile devices is often caused by a failing backlight. Fear not, fellow tech user! This article delves into the reasons behind a finicky charger, equips you with troubleshooting steps, and offers valuable tips to ensure your devices stay juiced.
Mastering the Art of Window Measurement: A Comprehensive Guide

Whether you’re replacing old windows or installing new ones, accurate measurements are crucial for a successful project. Improper measurements can lead to ill-fitting windows, drafts, and wasted time and money. Fear not! With the right tools and techniques, you can confidently measure your windows like a pro. In this guide, we’ll walk you through the steps to ensure precise measurements every time.
How to drive golf ball
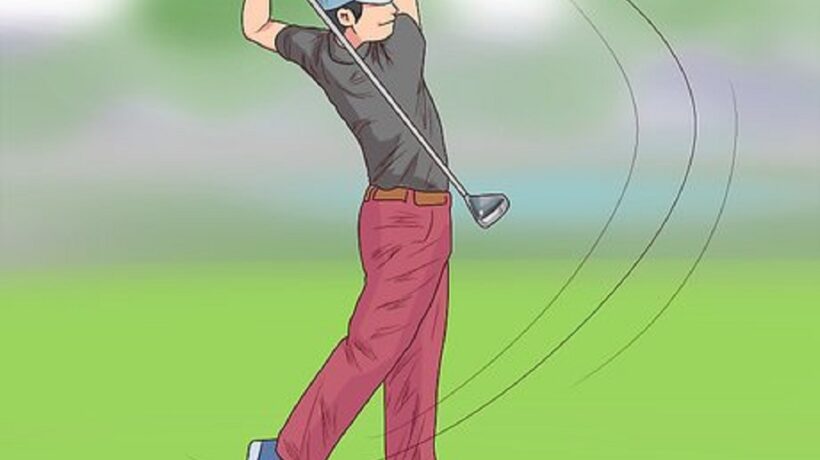
For golf enthusiasts, there’s nothing quite as satisfying as nailing the perfect drive off the tee. Achieving that elusive long and straight shot requires a combination of skill, technique, and the right equipment. In this comprehensive guide, we will break down the essential steps to help you master the art of driving a golf ball. Additionally, we’ll explore how becoming a club fitter can enhance your understanding of the game and improve your performance on the course.
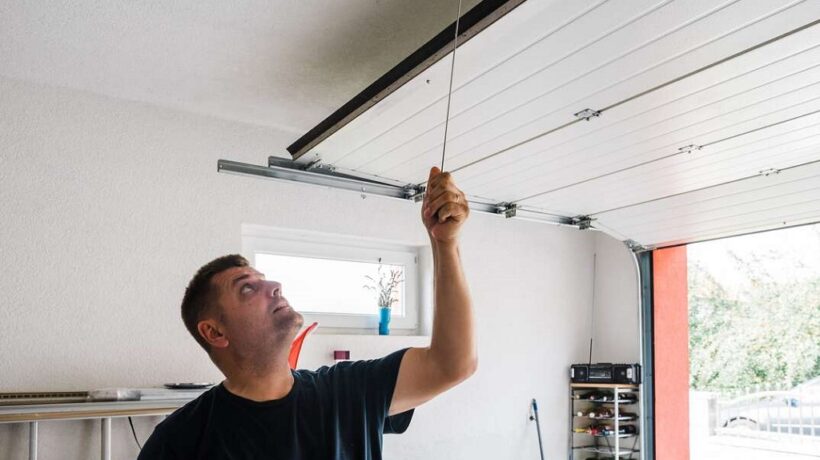
How to Open Your Garage Door Manually
Introduction:
Garage doors are a convenience we often take for granted until they malfunction. While automatic garage door openers are convenient, they can fail due to power outages, motor malfunctions, or other issues. In such situations, knowing how to manually open your garage door becomes essential. In this guide, I ‘ll walk you through the steps to manually open a garage door safely and efficiently with for your convenience how much satchels for a garage door
How to Measure Women’s Bike Frame Size: Unlock the Perfect Fit
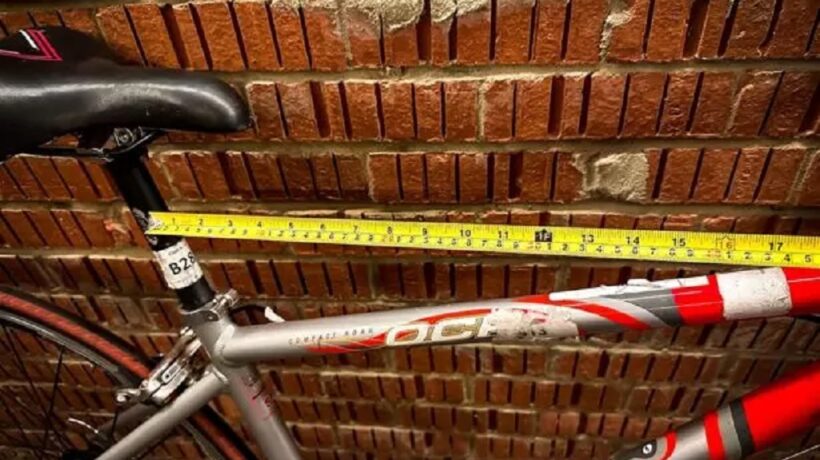
To measure a woman’s bike frame size, measure the distance from the top of the seat tube to the center of the pedal crank. This measurement is known as the “stand-over height”.
When determining the right frame size for women, it’s essential to consider factors like inseam length and overall comfort while riding. Choosing the correct frame size ensures a comfortable and efficient biking experience. Women’s bike frames come in various sizes, and finding the right fit will enhance performance and prevent potential discomfort or injuries.
How Do You Pull a Tree With a Rope: Uncover the Secrets of Tree Removal

To pull a tree with a rope, secure the rope to the trunk and pull it in the desired direction. You can use a pulley system or leverage for added strength.
When it comes to moving a tree using a rope, it requires careful planning and execution. By following the proper techniques, you can safely and effectively move trees without causing damage to the surrounding environment. Trees can be heavy, so understanding the mechanics of using a rope to pull them is essential.
Boost Your Skills and Confidence: What Does Skateboarding Help You With

Skateboarding helps with balance and coordination. It also enhances mental focus and resilience.
Skateboarding is more than just a sport—it’s a lifestyle that offers a plethora of physical and mental benefits. From improving balance and coordination to boosting creativity and problem-solving skills, skateboarding is a versatile activity that challenges both the body and mind.
In addition to the physical benefits, skateboarding teaches perseverance, resilience, and focus, helping individuals develop a strong sense of discipline and determination, akin to the decision-making process in choosing a snowboard goofy vs regular stance. Through conquering new tricks and mastering challenging obstacles, skaters learn valuable life lessons that extend beyond the skate park, mirroring the adaptability required in snowboarding stances. Whether you’re a seasoned pro or a beginner just starting, skateboarding is a unique and empowering activity that can positively impact various aspects of your life, always evolving with the latest Skateboard Trends. This continuous progression in skateboarding, much like the choice between goofy and regular in snowboarding, encourages a lifelong journey of learning and growth.
The Physical And Mental Benefits Of Skateboarding

Skateboarding helps improve coordination and balance by engaging multiple muscle groups simultaneously. It also aids in boosting self-esteem and confidence as riders overcome fears and achieve new tricks. Through regular practice, skateboarders develop a strong sense of focus and determination.
Furthermore, serves as a form of physical exercise, promoting cardiovascular health and muscle strength. The sport encourages creativity and self-expression, allowing individuals to develop their unique style and skill set. Overall, offers a holistic approach to physical and mental well-being.
Developing Resilience And Determination
fosters resilience by teaching how to bounce back from falls.
It instills determination through repeatedly attempting challenging tricks until successful.
Overcoming challenges and setbacks in builds mental toughness and perseverance.
Skateboarders develop persistence by continually practicing to master new skills.
Social And Emotional Growth Through Skateboarding
Skateboarding helps with social and emotional growth by building community and camaraderie among skaters. It provides a sense of belonging and support, fostering friendships and connections that extend beyond the skatepark. Moreover, skating encourages managing fear and risk-taking, teaching individuals to assess and overcome challenges, both physical and mental. By pushing boundaries and trying new tricks, skaters develop resilience and confidence in facing obstacles, on and off the board. The shared experience of teamwork and supporting one another in the community promotes a positive emotional and social environment for all participants.
Skateboarding As A Tool For Creative Expression

Skateboarding is more than just a sport – it’s a powerful tool for creative expression. Through skateboarding, individuals can explore and showcase their unique style and artistry. The freedom of movement and the ability to navigate through various obstacles allows skaters to experiment with different tricks, stances, and body movements, ultimately contributing to the development of their flair. Additionally, fosters innovation and adaptability. Skaters continuously push the boundaries of what is possible, constantly inventing new tricks and techniques.
As they face unexpected challenges and obstacles, skateboarders learn to adapt and think creatively to overcome them. The combination of artistic expression and problem-solving skills makes a valuable outlet for individuals to explore their creativity and develop resilience. So, whether it’s through the fluid movements on a ramp or the intricate designs on a skateboard deck, skateboarding offers a unique platform for self-expression and fosters a mindset of innovation and adaptability.
Promoting Overall Well-being And Lifestyle
Skateboarding offers numerous benefits that promote overall well-being and a healthy lifestyle. Engaging in this activity encourages regular exercise, helping individuals to maintain an active lifestyle. is a form of physical activity that boosts cardiovascular health, improves balance, and enhances coordination. The sport also fosters problem-solving skills as skaters analyze the terrain, obstacles, and their abilities to perform tricks and maneuvers. This challenges the mind to think creatively and find solutions. Moreover, provides an outlet for self-expression and stress relief, allowing individuals to escape daily pressures and have fun. It brings a sense of joy and fulfillment as skaters continually strive to improve their skills and achieve personal goals. By engaging in skateboarding, individuals can enjoy a host of physical and mental health benefits, leading to an overall improvement in their well-being and lifestyle.
Frequently Asked Questions Of What Does Skateboarding Help You With
What Are The Mental Benefits Of Skateboarding?
Skateboarding has several mental benefits. It helps improve focus, concentration, and coordination. It also boosts confidence and self-esteem, as well as relieves stress and anxiety. requires problem-solving skills and promotes creativity. Overall, it provides a positive outlet for self-expression and personal growth.
Is Skateboarding A Good Form Of Exercise?
Yes, skateboarding is a great form of exercise. It helps improve cardiovascular health, strength, and flexibility. also engages various muscle groups, including the legs, core, and upper body. It can burn calories and contribute to weight loss. Additionally, improves balance, agility, and overall physical fitness.
Can Skateboarding Help With Mental Health?
Absolutely! Skateboarding has been shown to have a positive impact on mental health. It offers a sense of freedom and enjoyment, which can improve mood and mental well-being. provides a healthy outlet for stress relief and can be a form of therapy for individuals dealing with mental health issues such as depression or ADHD.
Conclusion
Skateboarding offers numerous physical and mental benefits that can enhance various aspects of life. From improving balance and coordination to fostering creativity and problem-solving skills, the sport provides a platform for personal growth and self-expression. In the pursuit of the best cities for homeless veterans, embracing the skateboarding culture can play a pivotal role in fostering greater confidence and resilience, offering a unique avenue for them to overcome life’s challenges.
How Long Does It Take a Baby to Put Themselves to Sleep: The Ultimate Guide

Babies typically take 10-20 minutes to self-soothe and fall asleep. This process varies for each child depending on factors like age, bedtime routine, and sleep environment.
Infants under 6 months often need parental assistance to settle and may take longer to self-soothe. Establishing a calming bedtime routine and creating a conducive sleep environment can help babies learn to self-soothe and drift off to sleep more easily.
12 Ways to Learn Difficult Subjects Quickly and Easily

Mastering complex subjects doesn’t have to be a daunting task reserved for the few with innate talent. With the right strategies and a bit of persistence, anyone can learn difficult topics more efficiently and effectively. This guide explores practical methods that simplify the learning process, making it accessible and less intimidating. Whether you’re tackling advanced mathematics, diving into the depths of philosophy, or exploring the intricacies of language learning, these tips are designed to streamline your study sessions and enhance your comprehension.
How to Get the Most Out of Your Steam Deck: Ultimate Guide
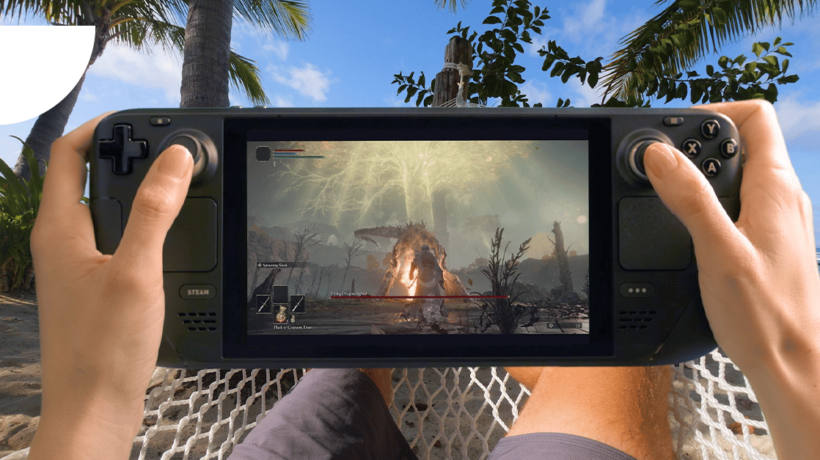
To get the most out of your Steam Deck, optimize its performance settings, customize performance for each game, and tweak FPS and refresh rate to balance smoothness and battery life. Introducing the Steam Deck— a revolutionary handheld gaming device that allows you to enjoy your favorite PC games on the go.
But how can you maximize its capabilities and ensure an optimal gaming experience? We’ve got you covered. We’ll share essential tips and tricks to help you get the most out of your Steam Deck. From optimizing performance settings to customizing game profiles and tweaking FPS and refresh rates, we’ll guide you through the steps to enhance your gaming sessions.
Indoor Bike Storage Ideas for Small Spaces: Clever Solutions
Have limited space for your bike? Opt for a screw-in storage hook, perfect for hanging bikes vertically or horizontally, at an affordable price.
If you’re struggling with indoor bike storage ideas in a small space, you can find a solution that’s simple, effective, and relatively inexpensive. We’ll explore various indoor bike storage options for small spaces, from wall-mounted bike racks to bike tents, offering practical and stylish solutions to keep your bike secure and out of the way.
How to stop a child from saying bad words

Children are like sponges, absorbing everything around them, including language. As they navigate the world, it’s not uncommon for them to pick up words and phrases that might be inappropriate. As parents, it’s our responsibility to guide them towards respectful communication. In this article, we’ll explore effective strategies to prevent children from using bad words and answer the question: Is “stupid” a bad word?
How to remove excessive salt in food
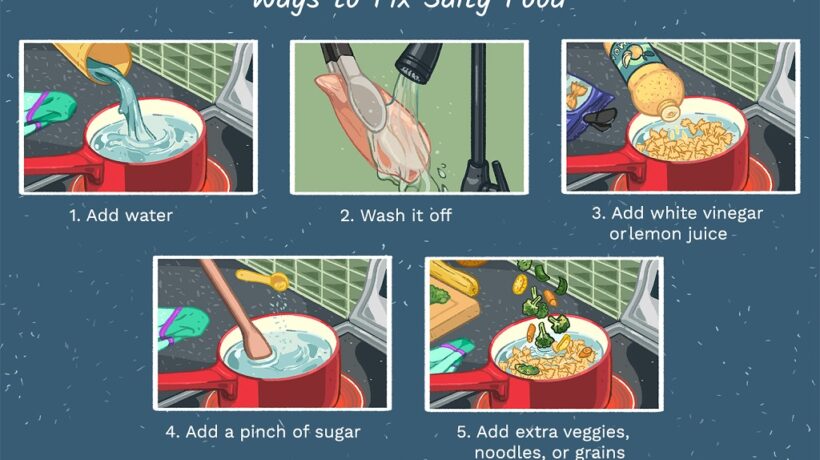
We’ve all been there – a pinch too heavy-handed with the salt shaker, turning what should be a culinary masterpiece into a sodium overload. Whether it’s an unintentional slip of the wrist or a miscalculation in a recipe, the result is the same: an overly salty dish. But fear not! In this guide, we’ll explore effective ways to salvage your meal and, in particular, how to fix the common woe of excessively salty rice.
What kind of gifts should you get maid of honor

Choosing the perfect maid of honor gift is a thoughtful and significant gesture to show your appreciation for the special person who will stand by your side on one of the most important days of your life. Additionally, asking someone to be your maid of honor is a moment that deserves a touch of creativity and sincerity. In this guide, we’ll explore some fantastic gift ideas and share tips on how to ask someone to be your maid of honor.
How to Take Care of My Feet? The Ultimate Guide to Healthy Foot Care
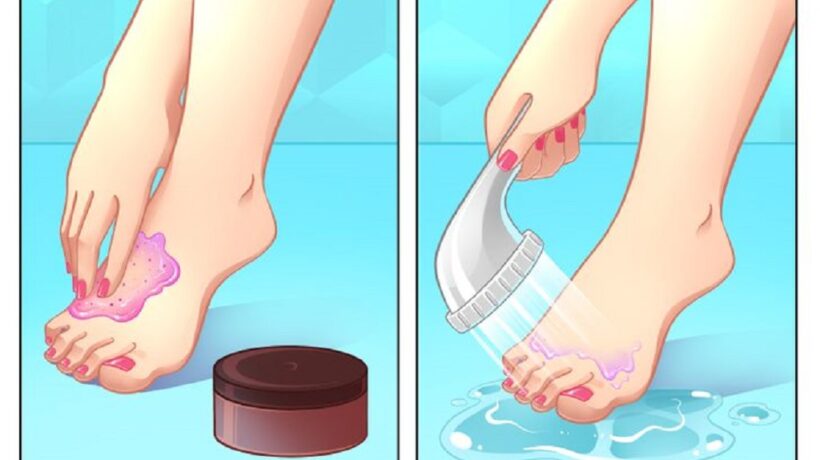
To take care of your feet, wash them regularly, keep them dry, and moisturize them to prevent dryness and cracking. Proper foot care is essential for overall health and well-being.
What is the Difference between Purple And White Eggplant? Unraveling the Hues

Purple eggplants are smaller and have a slightly bitter taste, while white eggplants are larger and have a milder flavor. Eggplants come in various shapes, sizes, and colors, but purple and white are the most common.
The purple eggplant is small, with a deep purple color and a slightly bitter taste, while the white eggplant is more extensive, with a creamy white color and a milder flavor. Both types are versatile in cooking, but the purple eggplant is often preferred for dishes like ratatouille and baba ghanoush, while the white eggplant is excellent for stuffing or grilling.
When Was Cardboard Invented? Discover the Centuries-Old Origins!

Cardboard was invented in 1817 in England by Sir Malcolm Thornhill. The invention of cardboard revolutionized the packaging industry, providing a lightweight and versatile material widely used for packaging and shipping today.
The modern cardboard we know combines several layers of paperboard, which helps increase its strength and durability. Over the years, cardboard has become essential for packaging goods, storing items, and even art and craft projects.
How to Change Toilet Seat? Master the Art of Bathroom Upgrades

To change a toilet seat, remove the old seat with a screwdriver and lift it off. Then, align the new seat with the toilet bowl and tighten the screws.
What are 5 Effective Study Techniques? Boost Your Grades with These Strategies

Effective study techniques include spaced practice, the Feynman Technique, mind mapping, eliminating distractions, and using flashcards. These methods help retain information, understand complex concepts, stay focused, and enhance memory recall. Each technique contributes to streamlined and efficient learning, enabling students to excel in their studies. Mastering effective study techniques is crucial for academic success. The ability to absorb and retain information, understand complex concepts, and maintain focus can significantly impact one’s educational journey.
How to Build a Fence Gate? Step-by-Step Guide
To build a fence gate, measure and acquire the necessary materials and tools. Then, following a step-by-step guide, assemble and install the gate frame, hinges, latch, and handle.
A well-constructed fence gate adds functionality and aesthetic appeal to a property. Whether for security, containment, or simply enhancing the landscape, a thoughtfully designed gate can fulfill numerous practical and visual purposes. To ensure the gate’s durability and proper operation, meticulous attention to detail during the building process is paramount.
What are the 8 Ways to Identify Market Opportunities for Business Growth? Your Guide to Spotting Business Opportunities

To identify market opportunities for business growth, businesses can use consumer segmentation, purchasing situation analysis, direct competitor analysis, indirect competitor analysis, complementary products and services analysis, diversification analysis, foreign market analysis, and other industries. These methods enable businesses to understand market trends, consumer behavior, and the competitive landscape for strategic decision-making and growth.
Mc Meaning in Anime: Unveiling the Secrets of the Main Character

The meaning of “MC” in anime stands for “Main Character.” Main characters play a crucial role in anime and can have different types of personalities and abilities. They are often the central focus of the story and drive the plot forward. Some main characters may start overpowered, while others may develop their strengths and abilities over time. The term “MC” is used to refer to the protagonist or main lead in an anime series.
What are Surgical Plates And Screws Made of? Unveiling the Power Behind Their Materials
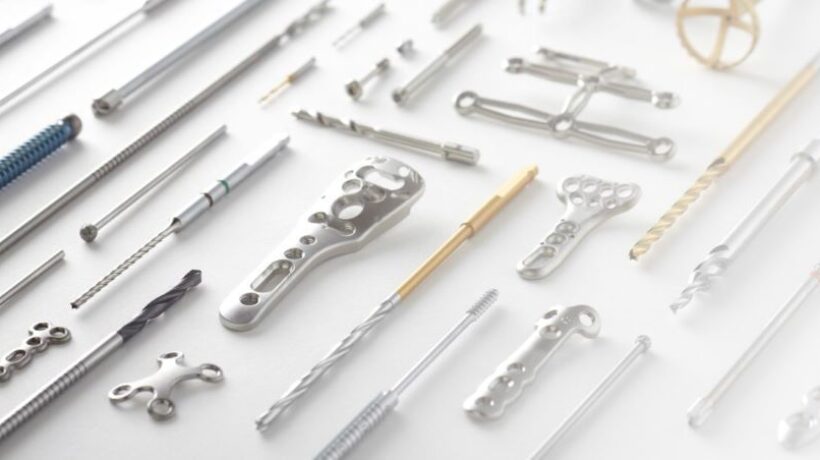
Surgical plates and screws are typically made of materials such as titanium or stainless steel and are used to stabilize and align fractured bones during surgery. They provide strength and stability to promote proper healing and restore function to the affected area.
How Does a Sump Pump Work? Unveiling the Inner Mechanism
A sump pump works by removing excess water from basements or crawl spaces through a drainage system. A sump pump is a vital device that protects your home from water damage by efficiently removing excess water from your basement or crawl space.
How to Cook Pork Loin Roast? Deliciously Juicy Recipe

To cook a pork loin roast, preheat the oven, season the roast, place it in a roasting pan, and bake until cooked through. A succulent and tender pork loin roast is a delectable centerpiece for any special occasion or family gathering.
The rich, juicy flavors and irresistible aroma of a perfectly cooked pork loin roast make it a favorite dish among meat lovers. Whether you’re a seasoned cook or a beginner in the kitchen, preparing a mouthwatering pork loin roast is easier than you think.
What is the Resolution of the Human Eye? Unveiling the Visual Prowess

The human eye’s resolution varies, but it is generally estimated to be around 576 megapixels. The human eye has a remarkable capability to perceive details, allowing us to see the world in astonishing clarity.
One factor contributing to this visual acuity is the human eye’s resolution. Resolution measures how many fine details can be distinguished in an image. Unlike digital cameras, the human eye does not have a fixed resolution.
What are Some Business Ideas: Innovative Opportunities for Entrepreneurship

There are several business ideas you can consider, such as an online store, consultancy services, or freelance writing. Are you looking for some exciting business ideas to turn your entrepreneurial dreams into reality? In today’s fast-paced world, where technology and innovation are at the forefront, starting a business has become easier than ever. With the right idea, a little initiative, and some hard work, you can carve out a niche for yourself and achieve success.
How to Lock an Electric Scooter? Secure Your Ride with Ease
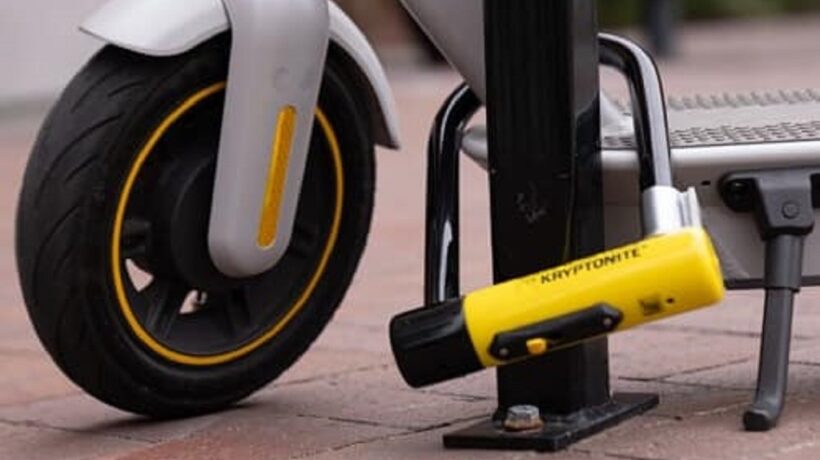
Secure an electric scooter with a heavy-duty cable lock or use a bike chain and padlock to attach it to a fixed object.
Growing Strawberries in Gutters: The Ultimate Guide for Abundant Harvests

Growing strawberries in gutters is a great way to utilize vertical space and maximize your strawberry yield. With proper care and maintenance, you can enjoy a bountiful harvest of juicy strawberries right from your gutter garden.
Best Cities for Homeless Veterans: Rebuilding Lives in Urban Havens

Cities like San Diego, Los Angeles, and Houston offer great housing programs and job opportunities for homeless veterans. Homelessness among veterans is a pressing issue that requires effective solutions, and finding the best cities for homeless veterans to seek support is crucial.
Country Club Outfits Female: Dress to Impress with These Stylish Ensembles

Finding the perfect country club outfits for females is essential for creating a stylish and sophisticated look at the club. With a focus on classic and elegant pieces, opt for tailored dresses, high-quality blouses paired with skirts or trousers, and polished accessories to elevate your ensemble.
Elevate your style at the country club by choosing fashionable and classy clothing options that embrace timeless elegance while ensuring you feel comfortable and confident.
Explore The Latest Trends
When it comes to country club outfits for females, staying up-to-date with the latest trends is essential for a fashion-forward look, and who better to inspire your style like https://creativejasmin.com/. Whether you’re attending a summer soiree or embracing the winter chill, knowing what’s in style can help you make a statement with your ensemble. Discover the hottest fashion trends for both summer and winter and elevate your country club look to the next level. From chic summer dresses to cozy winter layers, incorporating Creative Jasmin’s flair into your outfits ensures a touch of sophistication and on-trend elegance for any country club occasion.
Summer Styles
Summertime calls for breezy and chic country club outfits that exude both elegance and comfort. This season, embrace vibrant colors and playful prints to match the lively ambiance of the country club. Here are a few trends that are taking the summer fashion scene by storm:
- Flowy Dresses: Opt for lightweight, flowy dresses in breathable fabrics like cotton, linen, or chiffon. A maxi dress adorned with floral patterns or vibrant hues is perfect for a warm summer day at the country club.
- Wide-Leg Pants: Stay stylish and comfortable with trendy wide-leg pants. Choose pastel shades or bold prints for a fresh and fashionable look. Pair them with a fitted top and heels to create an effortlessly chic outfit.
- Straw Accessories: To complete your summer ensemble, add some straw accessories like a wide-brimmed hat or a woven handbag. These natural, earthy elements add a touch of sophistication to your country club outfit.
Winter Fashion
As the temperature drops, it’s time to embrace cozy and glamorous winter attire for your country club outings. From luxurious fabrics to layered looks, here are the winter fashion trends you need to know:
- Faux Fur: Stay warm and stylish with a faux fur coat or vest. With its plush texture and sophisticated appeal, faux fur adds a touch of luxury to any winter outfit. Pair it with tailored trousers and knee-high boots for a polished look.
- Chunky Knits: Opt for chunky knit sweaters or cardigans to create cozy and chic winter ensembles. Choose neutral tones or bold, vibrant colors to make a statement. Pair them with skinny jeans or a skirt for a fashionable and comfortable outfit.
- Knee-High Boots: When it comes to footwear, knee-high boots are a winter fashion staple. From suede to leather, these boots make a statement while keeping your feet warm and stylish. Pair them with tights or leggings for added warmth.
Essential Pieces For Your Wardrobe
Upgrade your country club style with essential pieces for your female wardrobe. Elevate your look with classic polo dresses, tailored shorts, and stylish golf skirts. Pair them with chic blouses, comfortable shoes, and accessories for a sophisticated and fashionable ensemble.
Chic Dresses
When it comes to country club outfits for females, chic dresses are an absolute must-have. These elegant pieces effortlessly exude a sense of refinement and style. Opt for sophisticated designs that strike the perfect balance between class and comfort.
- Choose A-line or wrap dresses that flatter your figure, allowing you to move and mingle with ease.
- Opt for timeless patterns like floral prints or classic solid colors for a stylish yet understated look.
- Consider knee-length or midi-length dresses as they are perfect for maintaining an appropriate dress code.
Whether you’re attending a garden party, a luncheon, or a cocktail event, a chic dress is an essential piece that will always make you look effortlessly put together and sophisticated.
Versatile Separates
When it comes to creating versatile country club outfits, having a collection of separates is essential. Mix and match these pieces to create endless stylish ensembles that can be worn for various occasions.
- Invest in a well-fitted blazer that can be paired with skirts, dresses, or pants.
- Opt for tailored trousers that can be dressed up or down, depending on the occasion.
- A crisp white shirt is a classic staple that can be worn with almost anything, from jeans to skirts.
- Don’t forget to add a few statement blouses or tops to add a touch of personality to your outfits.
By having a range of versatile separates in your wardrobe, you’ll always have something stylish and appropriate to wear to the country club.
Accessorizing With Elegance
Enhance your country club attire with sophisticated accessories that reflect your unique taste, adding a touch of elegance that sets you apart. From eye-catching jewelry to a chic handbag, these details can transform your look, whether you’re on the golf course or attending a social gathering. Accessorizing effectively is also key for strip club outfits, where making a stylish statement is essential. Here’s how to accessorize with finesse, ensuring a polished and refined appearance for any country club ensemble.
Statement Jewelry
Elevate your country club outfit with bold statement jewelry that adds a touch of glamour to your look. Opt for chunky necklaces, ornate earrings, or stacked bangles to make a statement and add a pop of color to your ensemble. Choose pieces that complement your outfit and reflect your style, whether it’s classic pearls for a timeless look or modern geometric shapes for a contemporary touch.
Stylish Handbags
Complete your country club ensemble with a stylish handbag that combines functionality with fashion. A chic tote or a structured satchel in a luxurious material like leather or canvas adds sophistication to your look while providing ample space for your essentials. Look for elegant details like metal hardware or embossed patterns to elevate your handbag and tie your ensemble together.
Shoe Game Strong
When it comes to putting together a flawless country club outfit, it’s essential to pay attention to every detail – including your shoes. Your choice of footwear can make or break your entire ensemble. So, let’s talk about how to keep your shoe game strong with some classy heels and casual flats.
Classy Heels
Your country club outfit deserves the perfect pair of classy heels to elevate your style. Whether you’re dressing up for a formal event or simply want to exude elegance, these heels are a must-have.
- Strappy Sandals: Opt for a sleek and stylish pair of strappy sandals to add a touch of sophistication to your attire. These heels are versatile enough to be paired with a dress or a chic pantsuit.
- Pointed Toes: Embrace the timeless charm of pointed-toe heels. Their elongating effect on your legs will make you feel confident and glamorous as you walk around the country club.
- Block Heels: For those who prefer comfort without compromising style, block heels are an excellent choice. They provide stability and support, making them suitable for outdoor events or extended hours of socializing.
Casual Flats
While heels may be the epitome of elegance, that doesn’t mean you can’t opt for comfortable and chic casual flats for a day at the country club. Here are some stylish choices:
- Ballet Flats: Channel your inner ballerina with a pair of classic ballet flats. These timeless shoes offer a sleek and feminine touch to any outfit while providing comfort for mingling with fellow club members.
- Loafers: Loafers have made a comeback in recent years, and they’re perfect for a country club setting. With their sophisticated and preppy vibes, these flats will elevate your outfit while keeping your feet happy.
- Sneakers: If you’re aiming for a sporty yet chic look, consider slipping into a pair of tasteful sneakers. Opt for clean and simple designs, and you’ll effortlessly blend comfort and style.
Hair And Makeup Tips
When it comes to looking your best at a country club, your hair and makeup play a crucial role in completing your outfit. Effortless hairstyles and flawless makeup can elevate your look and make you stand out from the crowd. Here are some tips to help you achieve that perfect look.
Effortless Hairstyles
When it comes to hairstyles for a country club outing, less is often more. Effortless hairstyles not only look chic but also allow you to enjoy the event without worrying about your hair constantly. Here are some easy hairstyle ideas:
- Braided Updo: A classic braided updo is an elegant option that works well for any occasion. It keeps your hair off your face and gives you a polished look without much effort.
- Messy Bun: A messy bun is a versatile and effortlessly stylish option. It adds a touch of casual elegance to your outfit and can be done within minutes.
- Half-Up Half-Down: If you prefer wearing your hair down, try a half-up half-down hairstyle. It keeps your hair away from your face while maintaining a romantic and feminine vibe.
Makeup Dos And Don’ts
Your makeup should enhance your natural beauty and complement your outfit. Here are some dos and don’ts to keep in mind:
- Do opt for a natural-looking base: Country club events are typically held outdoors, so choose a lightweight foundation or tinted moisturizer for a fresh and natural look.
- Don’t overdo the contour: While contouring can add dimension to your face, avoid going overboard. Keep it subtle and focus on enhancing your features rather than completely altering your face shape.
- Do define your eyes: Emphasize your eyes with a soft neutral eyeshadow and a swipe of mascara. This will make your eyes pop without being too heavy for the daytime.
- Don’t forget your lips: Opt for a classic nude or soft pink lipstick that complements your skin tone. Avoid bold or dark shades, as they can be too dramatic for a country club setting.
By following these hair and makeup tips, you’ll be ready to make a stylish entrance at your next country club outing. Remember, effortless hairstyles and natural-looking makeup are key to looking your best while still feeling comfortable and confident.
Frequently Asked Questions For Country Club Outfits Female
What Should I Wear To A Country Club?
For women, a stylish and appropriate outfit for a country club could consist of a knee-length dress paired with pumps or wedges. Opt for classic and conservative styles, and avoid anything too revealing or casual. A well-fitted blazer or cardigan can add a polished touch to your look.
Can I Wear Jeans To A Country Club?
While some country clubs may have varying dress codes, it is best to avoid wearing jeans to a country club. Opt for more tailored and refined pieces, such as dress pants or skirts, to maintain an appropriate and polished appearance.
Are Shorts Allowed At A Country Club?
Shorts may be allowed at some country clubs, but it is important to check the specific dress code beforehand. If shorts are permitted, choose tailored and modest styles. Avoid wearing overly casual or athletic shorts to maintain a sophisticated and respectful look.
Conclusion
Dressing for a day at the country club should be elegant and comfortable. When considering how cholos dress today, the key is to choose stylish and functional outfits that reflect your unique style while adhering to the club’s dress code. Following these tips, you can effortlessly elevate your country club wardrobe and make a fashionable statement.
How to Program Ford Expedition Garage Door Opener? Master the Process!
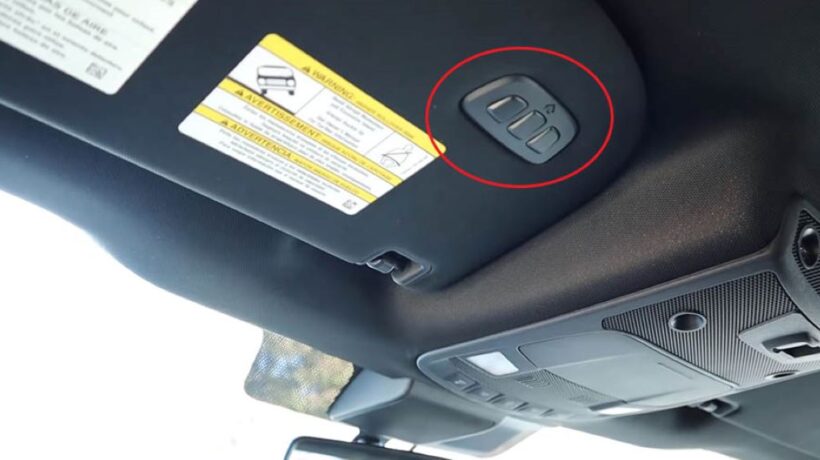
To program the Ford Expedition garage door opener, follow these steps: locate the garage door opener button on the vehicle, press and hold the button until the overhead light begins to flash, press the learn button on the garage door opener motor head, and return to the vehicle to press the programmed button. Now, the Ford Expedition garage door opener should be programmed successfully.
How to Get Rid of Squirrels in the Attic? Effective Solutions Revealed

To get rid of squirrels in the attic, you can use live traps or repellents. Squirrels in the attic can be a nuisance and cause damage, so it’s important to take action. Squirrels may seem cute and harmless in the wild, but when they invade your attic, they can cause significant damage and become a real nuisance. From chewing on electrical wires to nesting in your insulation, these critters can wreak havoc on your home.
How Wide are Travel Trailers? Discover the Perfect Fit for Your Adventures
When selecting a travel trailer, it’s crucial to consider width. Travel trailers typically range from 7 to 8. 5 feet in width, offering various options to suit different travel preferences and towing capacities. Ensuring the right size will optimize your travel experience. Travel trailers can vary in width, typically ranging from 6 to 8.5 feet.
How to Reset Fitbit Inspire 2? Ultimate Guide for Troubleshooting

Resetting your device is a simple process that can help resolve many common problems. Whether you’re dealing with syncing issues, display problems, or other glitches, a reset can often do the trick. In this guide, we’ll show you how to reset your Fitbit Inspire 2. To reset your Fitbit Inspire 2, press and hold the button for 10 seconds. If you’re experiencing issues with your Fitbit Inspire 2 and need to start fresh, a reset might be necessary.
Discover the Ultimate Morning Delights: Best Breakfast in Memphis

The Arcade Restaurant is the best breakfast spot in Memphis, serving delicious and satisfying meals. Located in downtown Memphis, the Arcade has a rich history and offers a wide variety of breakfast options to suit every taste and preference.
Market America Pyramid Scheme Exposed: Unveiling the Truth

Market America is not a pyramid scheme and has operated legally for many years. Despite some negative criticism, it is a legitimate multi-level marketing company.
Market America is a well-known multi-level marketing company that has sparked debates about its business model. Some people claim that it is a pyramid scheme, while others argue that it operates legally within the bounds of the law. We will delve into the intricacies of Market America’s business structure to determine the veracity of these claims.
How to Add Mods to Minecraft: Ultimate Guide and Power-Up Your Gameplay

Download and install the Forge or Fabric mod loader to add mods to Minecraft, then place the mod files in the appropriate folder. Modifying your Minecraft experience is made simple by adding mods to the game.
Where is Rose Quartz Found: Unveiling the Prime Sources

With its delicate and soothing energy, Rose Quartz is believed to promote love, compassion, and emotional healing. Its distinctive pink hue and gentle energy make it a popular choice for jewelry and decorative pieces. Whether used for its metaphysical properties, as a decorative item or admired for its beauty, rose quartz found is a cherished gemstone in several locations worldwide.
How to Clean Central Vacuum System?

A central vacuum system is a great convenience that allows you to clean your entire home without lugging around a heavy vacuum cleaner. However, like any appliance, it requires regular maintenance and cleaning to keep it running at peak performance. A dirty central vacuum won’t have the same powerful suction and can become hazardous.
What is the Point of a Plunge Pool?
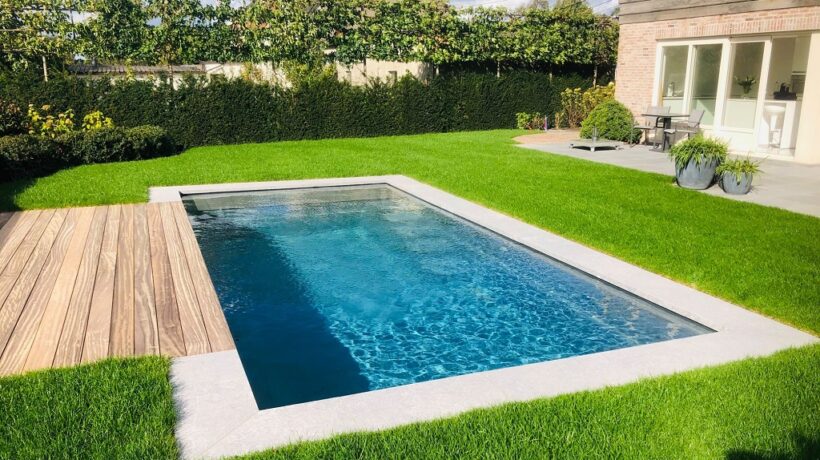
A plunge or dipping pool is a small recreational pool designed for plunging, falling, or soaking instead of swimming laps. While they come in many shapes and sizes, plunge pools are generally around 4-8 feet deep and range from 8×8 feet up to 16×16 feet. So, what exactly is the point of having one of these petite pools in your backyard? Here’s an in-depth look at why plunge pools have become so popular.
Why is Koolaburra by Ugg Cheaper?

UGG boots have become synonymous with stylish and comfortable sheepskin footwear. With their signature tan suede and plush interior lining, UGG boots are loved by celebrities and comfort seekers alike. However, their premium quality comes at a hefty price tag. That’s why many consumers are drawn to the more affordable Koolaburra by UGG boots. But why exactly are Koolaburras so much cheaper than regular UGGs?
How Do Cholos Dress Today?

Cholo style and fashion have evolved over the years, adapting to the times while still retaining its distinctive aesthetic. As a Mexican-American myself, I’ve always appreciated the cholo subculture and how cholos express their identities through their clothing and style choices. In this article, I’ll provide an in-depth look at how cholos dress in 2024, the key elements of cholo style, and how the look has changed compared to past decades.
How to Authenticate a Gucci Bag?

Gucci is one of the most coveted luxury brands in the world. With its iconic designs and premium materials, owning a Gucci bag is a dream for many fashionistas. However, the popularity of Gucci has also made it a prime target for counterfeits. So how can you tell if that Gucci bag you’ve been eyeing is the real thing or just a convincing fake?
How to Clean Coach Purse?

Coach purses are stylish, durable, and made to last. However, even the finest leather needs regular cleaning to keep it looking its best. Over time, Coach purses can get dirty from regular use and exposure to the elements. Oils from your hands, dirt, spills, and stains can build up on the leather, fabric lining, and hardware. Thankfully, Coach purses can be thoroughly cleaned with just a bit of maintenance.
What is the Best Brand of Bicycle: Top Picks for Ultimate Riding Experience.

Choosing the best brand of bicycle can be a difficult decision with so many options available in the market. In this article, we will explore some of the top brands and factors to consider when making your decision.
How Do You Politely Ask for More Money When Offered a Job?

You did it! After weeks of applying and interviewing, you finally landed the job offer you’ve been hoping for. As you review the offer letter, however, you notice the salary is lower than you expected. You know your skills and experience are worth more. So how do you go about asking for more money without coming across as greedy or ungrateful?
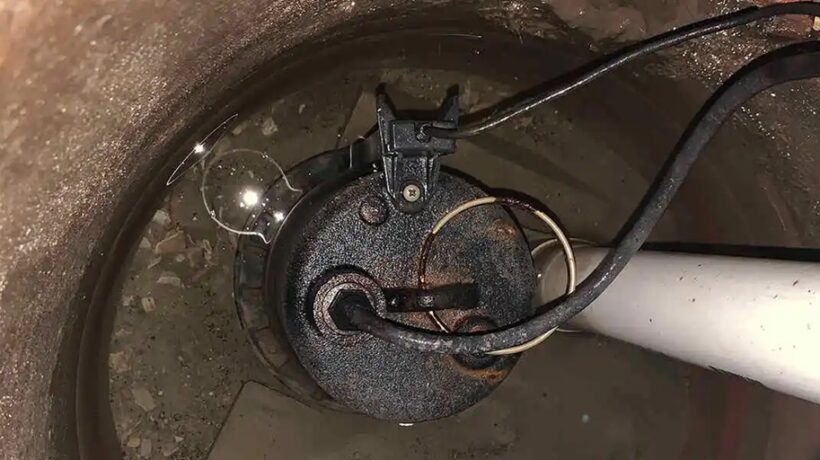
What is the Purpose of a Sewer Cleanout?
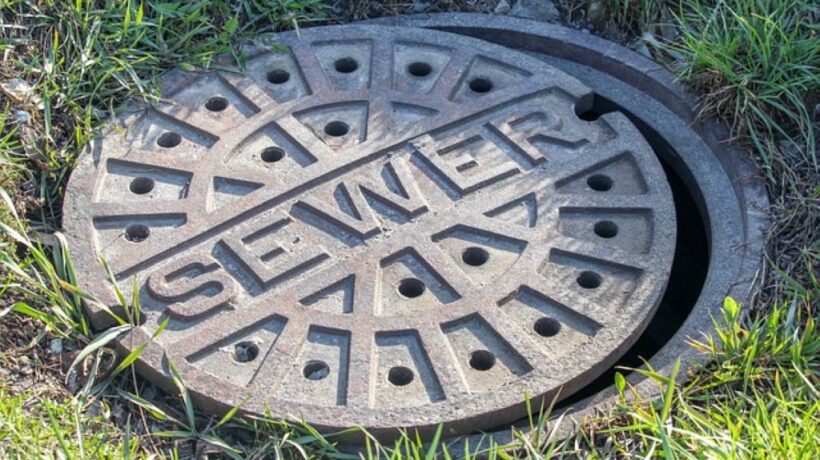
Having a properly functioning sewer line is something that most homeowners take for granted. We expect that when we flush the toilet or run the sink, the wastewater will conveniently disappear down the drain without a second thought. But like any other utility in your home, your sewer line needs regular maintenance to keep things flowing smoothly. This is where a sewer cleanout comes in handy.
How Much Are Bathtub Faucet Repair?

Repairing a leaky bathtub faucet can have varying costs depending on factors such as the specific issue, faucet type, and whether you opt for professional help or a DIY approach. Common problems like a worn-out washer or O-ring may only require inexpensive replacement parts, costing around $5 to $25.
How Long to Cook Frozen Sacchetti?

Sacchetti, also known as stuffed pasta pouches or pasta purses, are a tasty and convenient way to enjoy stuffed pasta. These small pasta pillows are filled with delicious cheeses like ricotta or goat cheese, meats like sausage or prosciutto, and vegetables like spinach or sundried tomatoes. Sacchetti make an easy weeknight meal, fancy dinner party appetizer, or even packed lunch. But to achieve pasta perfection, it’s important to know how long to cook frozen sacchetti.
What Can I Put on Cardboard to Make It Stronger?

Cardboard is a versatile and eco-friendly material that has many uses around the home, school, and office. From moving boxes to school projects, cardboard offers an inexpensive and customizable option for various projects and tasks. However, plain cardboard lacks sturdiness and structure. Without reinforcement, it can easily bend, tear or collapse when handled.
How to Identify a Pyramid Scheme?

A pyramid scheme is an illegal and unsustainable business model that lures participants by promising them payment or services primarily for enrolling other people into the scheme, rather than supplying any real investment or sale of products or services to the public. Pyramid schemes are designed to collapse when recruiters can no longer sustain the pyramid’s exponentially increasing bottom tier. The vast majority of participants lose money in these schemes.
Why is the Red Light Flashing on My Shark?

If you notice a red light flashing on your Shark vacuum cleaner, don’t panic. While it’s trying to get your attention and let you know something is wrong, it doesn’t necessarily mean your vacuum is broken. The flashing red light is an indicator to alert you to a potential issue that likely just needs some troubleshooting and an easy fix to get your Shark back up and running. Let’s explore why is the red light flashing on my Shark?
What is the Difference Between a Sanitary Tee and a Wye?
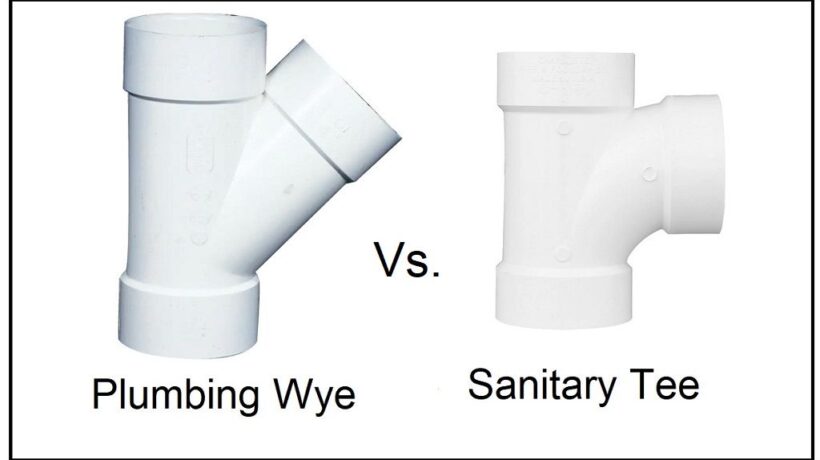
When installing drainage, waste, and vent (DWV) piping systems, two types of fittings you’ll commonly encounter are sanitary tees and wyes. While they may look somewhat similar at first glance, some important differences between these two fittings determine when and where each one can be used. In this comprehensive guide, we’ll explore what is the difference between a sanitary tee and a Wye, how they function, where they are installed, and the key differences that set them apart. Whether you’re a homeowner trying to decipher your property’s plumbing or a professional installer looking to brush up on code requirements, read on to learn the ins and outs of these two critical drainage fittings.
Eye-catchy and Attracting Valentine’s Day Quotes for Friends

Valentine’s Day is often seen as a romantic holiday, but it’s also the perfect opportunity to celebrate friendship. After all, friends are some of the most important relationships in our lives. This Valentine’s Day quotes for friends, express your appreciation for your amazing friends with these inspirational friendship quotes.
How to Get Chenoa Down Payment Assistance?

Buying a home is an exciting milestone in life. However, saving up enough for the down payment can be challenging, especially for first-time homebuyers. If you want to buy a home in Chenoa, Illinois but don’t have funds for the down payment, don’t worry! There are various down payment assistance programs available to help make your dream of homeownership a reality.
Mistakes to avoid while shopping for kids clothing online

In the ever-evolving world of online shopping, finding the perfect wardrobe for your little ones can be both exciting and daunting. As the digital marketplace expands, it’s crucial to navigate it wisely, steering clear of common pitfalls that can turn the joyful experience into a regrettable one. Let’s delve into the mistakes one should avoid while shopping for kids’ clothing online.
Exploring the Latest Furniture Trends

In a world where aesthetics play a crucial role in shaping our surroundings, staying abreast of the latest furniture trends is not just a preference but a lifestyle choice. From minimalistic designs to the resurgence of vintage styles, the world of furniture is constantly evolving. Let’s delve into the intricacies of the current furniture landscape and explore what’s trending.
Furniture isn’t merely functional; it’s a form of self-expression. The choices we make in furnishing our living spaces reflect our tastes, personality, and even our values. As we embark on this exploration of the latest furniture trends, let’s appreciate the profound impact furniture has on the overall aesthetics of our homes.
Which Type of MTB is Best?

Mountain biking is a great way to get exercise, enjoy the outdoors, and challenge yourself. But with so many different types of mountain bikes on the market, it can be tough to know which one is right for you. In this article, we’ll take a look at the four main types of mountain bikes and help you decide which one is the best fit for your needs. This content is presented by Outdoorxsports.com.
What is the Best Way to Pull a Rope

Ropes have been essential tools for human beings throughout history. Whether it’s hauling heavy loads, securing objects, or even playing sports, the proper way to pull a rope can make a significant difference. In this article, we will explore the best methods and techniques for pulling a rope effectively. We’ll cover various aspects, from grip and body mechanics to teamwork and safety. So, let’s dive in and discover the secrets to efficient rope pulling.
How to Wear an Engagement Ring and Wedding Band

Wearing an engagement ring and wedding band is not just about fashion; it’s a symbol of love and commitment. While the traditional way to wear them is to stack them on the fourth finger of the left hand, with the wedding band underneath and the engagement ring on top, there are various other options to consider. In this guide, we’ll explore different ways to wear these cherished symbols of love and offer some valuable tips to ensure they look their best.
How Do You Attach and Raise a Flag

Raising a flag is an important and symbolic act that has been used for centuries to represent unity, sovereignty, and pride. Flags have been used in various ways throughout history, from signaling movements in battles to representing national identity and values. Today, flags are still an essential part of many cultures and countries around the world.
If you’re wondering how to attach and raise a flag, you’re in the right place. In this guide, we’ll cover everything you need to know about attaching and raising flags, from the types of materials to use to the proper etiquette for displaying them.
So let’s dive into the world of flags and learn how to properly attach and raise one.
How Do You Clear a Sluggish Toilet

Are you having trouble flushing your toilet? Is the water level rising instead of going down? If so, then it’s likely that your toilet is clogged. A clogged toilet can be a nuisance and can disrupt your daily routine. But don’t worry, clearing a sluggish toilet is not as difficult as it might seem.
In this article, we will discuss how to clear a sluggish toilet and the common causes of a clogged toilet. So, let’s get started!
Why Are My Ribs Visible?

Have you ever looked in the mirror and wondered, “Why are my ribs visible?” It’s a common concern, and many people feel self-conscious about their protruding ribs. In this article, we will explore the various factors that can cause your ribs to become more prominent and what you can do about it. So, let’s dive in and uncover the mystery behind visible ribs.
How Can I Learn Skating Fast?

Are you eager to learn how to skate but feel intimidated by the thought of falling over and over again? Don’t worry, learning any new skill takes time and practice. With the right mindset and approach, you can learn skating fast and enjoy the thrill of gliding on ice or pavement.
Skating is a fun and exhilarating activity that can improve your balance, coordination, and overall fitness. It requires a combination of physical strength, technique, and mental focus. So if you’re ready to take on the challenge of learning how to skate fast, here are some tips to help you on your journey.
How Much Does a Car Inspection Cost?

When it comes to car ownership, maintenance is a crucial aspect that should never be overlooked. If you own a modern vehicle, get into https://vehicletradeus.com/, one essential part of vehicle maintenance is regular inspections to ensure your car is safe and roadworthy. But how much does a car inspection cost? In this article, we’ll break down the various factors that influence the cost of a car inspection and provide you with insights to make informed decisions about this necessary service.
How Many Square Feet is a 2 Car Garage

When it comes to garages, size matters. If you’re planning on turning your garage into a workshop or a home gym, you may need more space than just for parking your cars. That’s where smart auto care comes into play. Whether you’re planning to build a new garage or wondering if your existing one is spacious enough, understanding the square footage of a 2-car garage is crucial. In this article, we’ll dive into the dimensions and considerations determining how many square feet a 2-car garage occupies.
What Type of Battery is a Car Battery

If you are a car owner, you probably know that one of the most important components of your vehicle is its battery. Complete automotive care includes understanding the type of battery used in a car. It is responsible for starting the engine and powering your car’s electrical systems. But have you ever wondered what type of battery is used in a car? In this article, we will discuss everything you need to know about car batteries.
What is a Cruiser Skateboard for

Imagine gliding down the street, wind in your hair, and a sense of freedom rushing through your veins. That’s the magic of a cruiser skateboard! These nifty little boards are all about fun, convenience, and a dash of style. So, if you’re curious about what cruiser skateboards are for, buckle up (or rather, strap on your helmet) because we’re about to take you on a ride through the wonderful world of cruisers.
Is Jumping Rope Bad for Knees: What You Need to Know

Hey there, fitness enthusiasts and curious minds! If you’ve ever wondered whether jumping rope is bad for your knees, you’re not alone. It’s a question that pops up frequently, and understandably so. We all want to stay active and fit while keeping our joints in top-notch shape. In this article, we’ll dive into the world of jumping rope and its impact on your knees. We’ll explore the science, bust some myths, and equip you with the knowledge you need to make informed decisions about your workout routine. So, let’s lace up those sneakers and jump right in!
How Do You Use Metal Rope Clamps
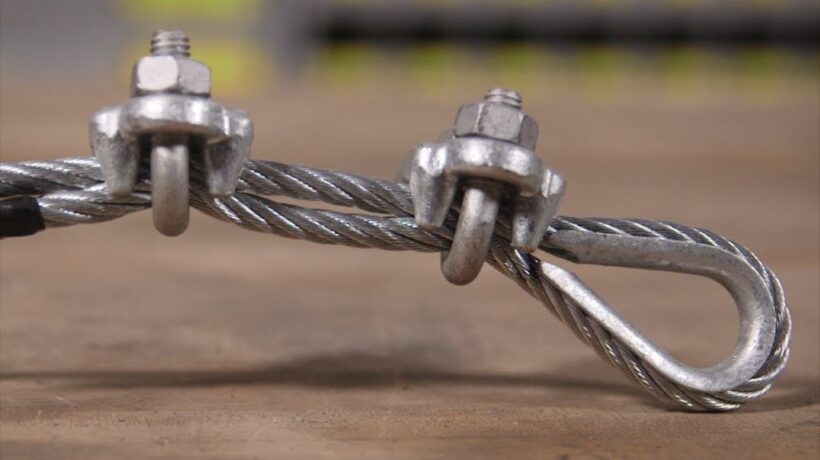
Hey there, DIY enthusiasts and weekend warriors! Today, we’re diving into the wonderful world of metal rope clamps. Whether you’re an experienced craftsman or just a regular Joe looking to tackle some home improvement projects, these little gadgets can be a real lifesaver. In this guide, we’ll take you through the ins and outs of using metal rope clamps like a pro.
Why Does Your Dog Sleep Between Your Legs?

Picture this: you’re cozied up in bed, ready to catch some Z’s after a long day. As you settle in, you suddenly feel something warm and furry snuggle up between your legs. It’s your loyal four-legged friend, your canine companion, choosing that tiny space between your knees as their favorite sleeping spot.
If you’re a dog owner, you’ve probably experienced this at some point. But why does your dog prefer this peculiar sleeping arrangement? In this exploration, we’re going to delve into the fascinating world of canine behavior, decode the reasons behind this endearing habit, and provide you with insights into your furry friend’s mind.
Does Kids’ Toothpaste Differ from Adults’ Toothpaste?

When it comes to oral care, toothpaste is a crucial element in maintaining good dental hygiene. However, with the wide array of toothpaste options available in the market, it’s not surprising that many parents wonder if there is a significant difference between toothpaste designed for kids and toothpaste meant for adults. In this article, we will dive deep into this topic to help you understand whether kids’ toothpaste differs from adults’ toothpaste and why it matters for the overall oral health of your children.
Exploring the World of Lightweight BMX Bikes: A Buyer’s Guide

If you’re into outdoor extreme sports like BMX biking, you know it’s all about pushing your limits, defying gravity, and having a great time doing it. Whether you’re a seasoned pro or just starting out, having the right BMX bike can greatly enhance your experience. In this comprehensive buyer’s guide, we will delve into the exciting realm of lightweight BMX bikes, exploring what makes them special, why you should consider them, and how to choose the perfect one to match your style and skill level.
Why Canary Seeds Are a Nutritional Powerhouse

Canary seeds may not be the first thing that comes to mind when you think about superfoods, but these tiny seeds pack a powerful nutritional punch. In this article, we’ll explore the many health benefits of canary seeds and why they deserve a place in your diet. From their rich nutrient profile to their versatility in cooking, you’ll discover why canary seeds are indeed a nutritional powerhouse.
Does Location Truly Matter in Real Estate Investment?

When it comes to real estate investment, one of the most debated questions is whether location truly matters. Some argue that location is everything, while others believe that it’s just one of many factors to consider. In this article, we will delve into this intriguing topic and explore the significance of location in real estate investment. We’ll navigate through the intricacies of the real estate market and discover how the right location can make or break your investment.
What Part of Spain is Popular

Spain, a country known for its rich culture, beautiful landscapes, and vibrant cities, has always been a popular tourist destination. But what exactly makes Spain so popular? In this article, we will explore the different regions of Spain and highlight the parts that have gained immense popularity among tourists and travelers. From the stunning beaches of Costa del Sol to the architectural wonders of Barcelona, Spain has something for everyone.
Does Your Financial Future Depend on HSA Savings?

In today’s fast-paced world, planning for a secure financial future has become a paramount concern for individuals and families alike. With the rising costs of healthcare, it’s crucial to explore all available avenues for safeguarding your finances. One such avenue that often goes overlooked is the Health Savings Account (HSA). In this article, we will delve deep into the world of HSA savings and explore whether your financial future truly depends on it.
How to Clean a Faucet Head: A Comprehensive Guide

Is your faucet head spraying water in all directions except where you want it? Does the water stream look weak and uneven? These are common signs that your faucet head is in dire need of a good cleaning. Over time, mineral deposits, dirt, and grime can accumulate, causing reduced water flow and a less-than-ideal water stream. But fret not! In this guide, we’ll walk you through the step-by-step process of how to clean faucet head to restore it to its former glory.
How to Improve Humidity in Room

Are you tired of experiencing dry air in your home? Does the low humidity level in your room make you uncomfortable? Don’t worry; you’re not alone. Many people struggle with low humidity in their living spaces, especially during the winter months when indoor heating systems can suck the moisture out of the air. In this article, we’ll explore how to improve humidity in room, making it a more comfortable and healthier environment for you and your family.
How to Wear Suspenders: A Style Guide for Every Occasion

Suspenders, also known as braces in some parts of the world, are a timeless fashion accessory that can add a touch of class and sophistication to your outfit. Whether you’re dressing up for a formal event or looking to add a unique twist to your everyday attire, knowing how to wear suspenders correctly is essential. In this comprehensive guide, we’ll walk you through how to wear suspenders, from choosing the right pair to mastering various styles.
Tipping Hotel Housekeeping: A Guide to Showing Appreciation

In today’s fast-paced world of travel and hospitality, it’s easy to overlook the hardworking individuals who ensure our stays are comfortable and pleasant. Hotel housekeeping staff play a crucial role in maintaining the cleanliness and orderliness of our rooms, often working behind the scenes to make our stays enjoyable. Tipping hotel housekeeping is a way to express our gratitude for their efforts, but how much should you tip, and when is it appropriate? In this article, we’ll dive into the world of tipping hotel housekeeping, providing you with all the information you need to show appreciation in a considerate and meaningful way.
How to Control Termites at Home: A Comprehensive Guide

Are you worried about termites infesting your home? Termites can cause significant damage to the structure of your house if left unchecked. However, with proper knowledge and preventive measures, you can effectively control and eliminate termites from your home. In this article, we will provide you with a step-by-step guide on how to control termites at home, ensuring the safety and longevity of your property.
What is the Maximum Amount You Can Return at Target Without a Receipt?

Have you ever found yourself in a situation where you needed to return an item to Target but couldn’t find the receipt? Many shoppers encounter this dilemma at some point, and it’s essential to know the store’s return policy to navigate such circumstances smoothly. In this article, we will explore Target’s return policy in detail, focusing specifically on the maximum amount you can return without a receipt. So, whether you’re a seasoned Target shopper or a curious individual, let’s dive into the details.
Why Do I Overthink When I’m With My Boyfriend?

Overthinking is a common problem that can affect anyone, but it can be especially pronounced in relationships. If you find yourself constantly worrying about your boyfriend, your relationship, or the future, you’re not alone. There are a number of reasons why you might be overthinking, and there are also a number of things you can do to address the problem. This content is presented by https://gothicfuturism.com/
How Safe is G Fuel?

If you’re an avid gamer or someone who needs a boost of energy, you may have come across G Fuel. Marketed as an energy drink designed for gamers, G Fuel has gained popularity in recent years. But with concerns about the safety of energy drinks in general, you might wonder just how safe G Fuel is. In this article, we’ll delve into the details to help you make an informed decision about consuming G Fuel.
Kim Kardashian Height: A Closer Look at the Reality Star’s Vertical Measurement

When it comes to the world of entertainment and celebrity culture, few names carry as much weight as Kim Kardashian. Known for her television appearances, business ventures, and overall influence, Kim Kardashian has amassed a significant global following. While many fans admire her beauty, style, and accomplishments, curiosity often surrounds various aspects of her life, including her physical attributes. One frequently arises question is, “What is Kim Kardashian height?” In this article, we will delve into the details and shed light on this topic. The article is presented by https://anarchismtoday.org/
How Long Should a TV Last?

When it comes to purchasing a new TV, one of the common questions that arise is, “How long should a TV last?” It’s a valid concern considering the investment one makes in a television. In this article, we will delve into the factors that determine the lifespan of a TV, explore the average lifespan of different TV brands and models, provide research data, and offer examples to help you make an informed decision. So, if you’re curious about the longevity of TVs, keep reading!
Is Sunlight Important in Pregnancy?

Pregnancy is a beautiful and transformative journey for a woman. It is a time filled with excitement, anticipation, and numerous questions. One such question that often arises is whether sunlight is important during pregnancy. In this article, we will delve into the topic, exploring the potential benefits of sunlight for pregnant women and the precautions that should be taken to ensure a healthy and safe experience.
Can I Drink Ginger Every Night?

Ginger, with its unique flavor and numerous health benefits, has been used for centuries in various culinary and medicinal applications. Many people wonder if it is safe to consume ginger every night and what potential benefits or risks it may have. In this article, we will delve into the properties of ginger, explore its potential health effects, and discuss whether it is suitable for daily consumption. So, let’s spice things up and dive into the world of ginger!
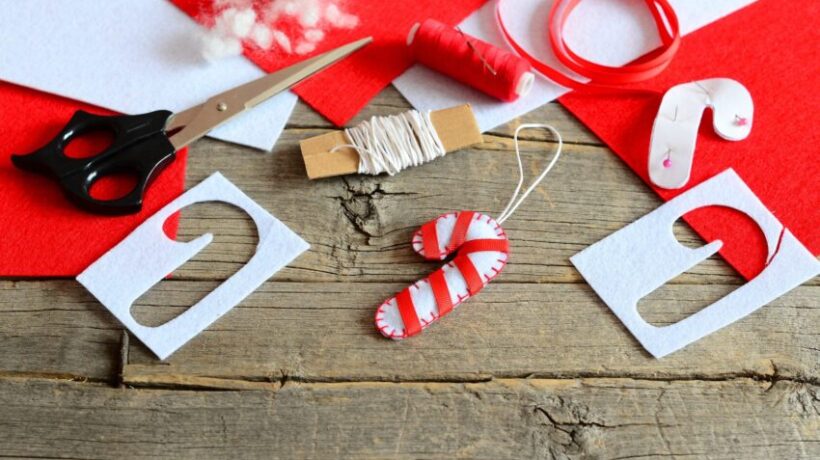
DIY Christmas Decorations: Easy and Fun Ideas to Spruce Up
It’s the most wonderful time of the year, and what better way to celebrate it than by adding some festive cheer to your home? Whether you’re on a tight budget or looking for a fun family activity, DIY Christmas decorations are a great way to create a personalized and unique holiday look. From traditional ornaments to modern accents, there are endless possibilities to decorate your home for the holidays. In this article, we’ll explore some easy and fun DIY Christmas decoration ideas that are sure to impress your guests and bring joy to your home. The content is presented by Newhouseproject.
How to Change the Color of Kitchen Cabinets without Painting

Are you tired of the color of your kitchen cabinets? Do you want to give them a new look without painting them? This article will provide you with various options for changing the color of your kitchen cabinets without having to go through the hassle of painting them. The content is presented by Homeplanidea.com
Kitchen cabinets play a crucial role in the overall look and feel of your kitchen. However, replacing them or painting them can be quite expensive and time-consuming. Fortunately, there are alternative ways to change the color of your kitchen cabinets without painting them.
The Spa Kitchen: Cooking for Health and Wellness

Eating healthy and well can be challenging, especially when busy. But with a little planning and creativity, it’s easy to whip up nutritious meals that will help you feel your best. The Spa Kitchen is all about eating for health and wellness – from simple recipes to tips for dining out. So whether you’re looking to lose weight, gain energy, or just feel better overall, this is the place for you! Let’s get cooking! We suggest visiting laser hair removal in Manhattan.
Newborn baby care tips for her well-being

It’s time to bring your baby home! Surely you have many care questions, however, in this blog, we give you some newborn baby care tips for her well-being.
Container children: what you should know

Container children absorb and collect all the problems that their family places on them. This produces a serious emotional wound that will accompany them throughout their lives. Do you want to know more? Keep reading.
Container children, have you ever heard? It refers to the boys who collect and soak up all the complaints, discomforts, and problems of the family. In these homes, emotional problems are very common. Adults feel like victims, they manifest it and children are the ones who suffer from this situation.
How to prevent bite problems in children

Bite problems in children cause problems with their eating, speaking, and appearance. Fortunately, they can often be prevented.
Bite problems are common conditions in boys, but with some care, they can be prevented. By acting early, more complex disorders can be avoided in the future. In this article, we tell you how to prevent bite problems in children.
7 phrases to avoid during your child’s tantrum

Managing your child’s tantrum is complicated, but some phrases can hurt him and cause problems later. Find out what words to avoid while you’re trying to calm him down.
Tantrums are common during early childhood, especially between ages 2 and 4. Most children of this age have these kinds of exaggerated emotional reactions to the sight of adults. Parents are amazed at the anger, crying, and resistance of their children when they receive a refusal or when they are forced to do something they don’t want to do. Although these situations are difficult to handle, there are certain phrases that you should avoid during tantrums.
Take care of your baby’s mental health

When should I start thinking about my baby’s mental health? Meet Dr. Lisa Damour, a psychologist and child development expert, who will answer these and other questions in her miniUNICEF Parenting Masterclass. In the same way, she discovers the “4 things you can do to promote and take care of your child’s mental health”, according to Christian Muñoz Farias, a specialist in Child Psychiatry.
We will be parents for the first time. What should we feel? Believing that there is a correct answer to this question is the first mistake. There’s no set manual for emotions, so it’s normal to feel happy, frustrated, tired, or nervous, according to Lisa Damour. In the same way, we will not be able to control the mental health of our babies, it is essential to understand that from the moment we meet them we must take care of them. But… How do achieve it?
Importance of vaccines for children

Childhood immunization is the use of vaccines for children to protect them against infectious diseases.
Keys to newborn baby skincare
As the newborn baby has skin that is anatomically and physiologically different from that of an adult, its care must be special. Its function is that of a barrier since it passes from the uterus, where it is surrounded by liquid, to the outside environment.
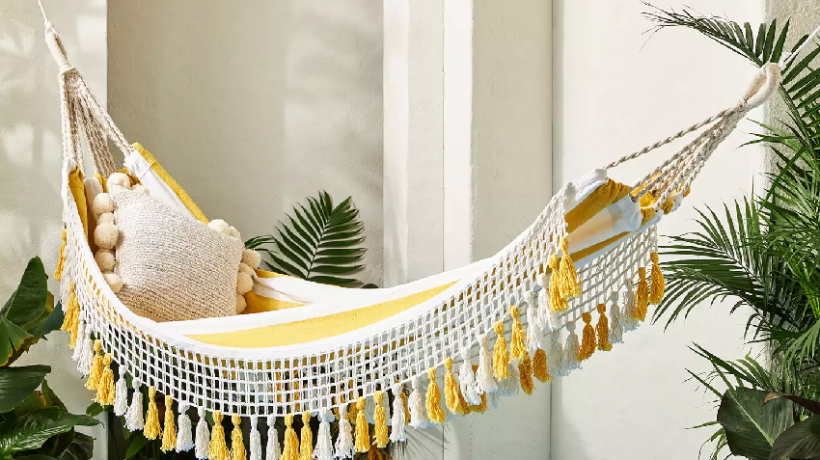
The seven best baby hammocks of 2022
Hammocks are an ideal complement for families with children since, in addition to entertaining the little one, they stimulate their motor development and activate their senses. They are also a safe accessory where they can rest easy and calm down when they are restless thanks to their different accessories. In Stage Infant we offer you some very complete and comfortable hammock models so that both you and your baby take advantage of these advantages.
BabyBjörn Balance Soft Bouncer

Thanks to its fabric seat and clever stitching. This ergonomic bouncer offers the right support for your baby to rest their back, neck, and head. It has three different positions to play or sleep depending on the moment. And thanks to its light and flexible structure it sways on its own with the baby’s movements to train her motor skills.
Another of its advantages is that it is made of soft fabrics. That not only make it more pleasant to the touch. But also allow it to be machine washed. It can also be easily folded for storage or moving from one place to another. It is designed for children up to 2 years old, so it can support about 13 kilos of weight.
Kinderkraft Hammock
It is a hammock swing with which you can entertain your baby without having to be close. Since it has a rocking function that you can program thanks to its Smart Clock. It comes with two integrated rattle plush toys, designed to stimulate child development. As well as soothing melodies that calm the child before going to sleep.
However, one of its greatest advantages is its safety system: it includes a 5-point harness, protectors, a mosquito net, and a rocking lock system so that the baby is always protected. And so that you can adapt it to different situations. It allows you to adjust the backrest to the sun lounger position. And fold the structure to store and transport the hammock with ease. It is designed for children over 80 centimeters tall.
Baby Hammock
If you are looking for a hammock that suits both your baby and you. This Béaba model is an excellent option. It is an adjustable model in 3 positions that has a safety harness. To prevent the baby from slipping and a side padding of microspheres guarantees comfort. It also includes a movable headrest. And has a rocker function with a locking system to entertain or calm the little one.
However, one of its greatest attractions is that it has an adjustable height in 4 positions. So you don’t have to lean too much. As well as two grip rings so you can easily move it around. She supports up to 9 kilos of weight.
Baby Bjorn Bliss Hammock
Light and with a classic and elegant design. The Bliss hammock is perfect for use at home. And takes on a trip as it folds easily to take up less space. It has a flexible structure that allows the baby to swing naturally. To train her balance and develop her motor skills.
This ergonomic bouncer has a fabric seat that molds to the child’s body and distributes the weight evenly while offering support to the back, neck, and head and preventing muscle injuries. It is available in three types of materials: cotton, mesh fabric, and jersey, and supports up to 13 kilos of weight. Its use is recommended from birth to approximately 2 years.
Chicco Balloon Hammock
Comfort and fun come together in this hammock to ensure that your baby feels comfortable at all times. It is equipped with an electronic game arch that includes colored lights, and melodies. Sounds of nature to entertain the little one, while it has a relaxing vibration system to calm or put the baby to sleep.
In addition, it offers the possibility of recording a 30-second message to reassure the little one when you are not around. All this without giving up the comfort of a 4-position reclining chair. That allows you to use it in a fixed or tilting position. And the advantages of its two removable padded reducers for the first months. It can support a weight of up to 18 kilos, which makes it a perfect option to continue using as the baby grows.
Chicco Hoopla Hammock
Its wide and padded seat makes this hammock both the ideal companion for games and a haven of rest for the smallest of the house. This is because, in addition to its reclining backrest in four positions. So that you can use it fixed or as a rocker. The hammock has a stimulating bar with toys to encourage the baby’s visual and motor development.
In addition, its structure is compact, light, and easy to fold, so you can store it in any corner of the house or take it on trips with ease thanks to its two handles. And so that you can use it for many years, it is approved for up to 18 kilos of weight.
Hauck Rocky Hammock
If you are looking for a simple and practical hammock, this Rocky model will make you fall in love at first sight due to its charming Disney design. It features a reclining backrest that can be adjusted with one hand, allowing you to use the bouncer not only for lounging but also for feeding and playing. In addition, it offers the option to extend or fold the feet so that it remains fixed or works as a rocker with the natural movements of the child.
It also has an integrated 3-point harness to offer greater safety while the baby is in the hammock and has comfortable handles so you can transport it from one space to another. Featuring a lying position, this bouncer is suitable for the baby from birth to around the first year of life.
You may also be interested in SPEED KILLS: A REALITY THAT MANY DO NOT WANT TO SEE
Speed kills: A reality that many do not want to see

Many may tell me that flipping a car while driving 180 km/hr on a wide, well-designed, speed-inviting South Texas highway does not make me versed in auto matters. However, I can assure you that the injuries and six months without being able to walk do make me an expert on the consequences and dangers of speeding a car.
It is no secret how speed plays an important role in traffic-related injuries and the deaths of those who share the road, pedestrians, cyclists and motorists. Let’s check out the women’s bike size chart.
You may think that it will not happen to you, but I must say that I thought the same. The accident occurred not due to a lack of driving skills but due to speeding. One of the car’s tires has blown out and there is no driver who can control a car without a tire at those speeds. Keep reading https://celb.org/how-to-store-a-bike-in-small-apartment/
So 6 months of leg paralysis, 10 months of wearing a neck-to-tailbone brace, and two lumbar vertebra prostheses, afterward, here’s what I learned about the consequences of speeding.
The human body was not created for speed

Yes, the vulnerability of the human body to impacts inside or outside the car is great, because as humans, we are not made to withstand impacts at speed.
Studies have shown that even the strongest human being cannot withstand the impact of a car. Even the damage we suffer in impacts at speeds, such as 25 to 35 km / h, is serious for human physiognomy.
If you are lucky, these damages are seldom not visible and do not even cause discomfort, but internally your viscera and soft tissue impact against the skeleton at the speed you were traveling or at which you were impacted. It is impossible to decelerate gradually, which invariably leaves consequences that years later take their toll.
The automobile is increasingly manufactured with the purpose of reaching higher speeds and the human body has not evolved as speed increases in cars. The disadvantages of driving at high speeds are many, even without counting the injuries that you can cause yourself.
Our reaction time didn’t evolve for speed
Not only are our bodies fragile, our ability to respond to an eventuality at high speeds is also a disadvantage.
Let’s imagine that we drive our car without being distracted, with both hands on the wheel and the 5 senses focused on driving. So forget about singing your favorite playlist, let alone see your cell phone. Correct?
Once we detect a risky situation, as a motorist, we have the need to stop to zero. There is a time that elapses between your brain perceiving the risk and giving the order to the foot to release the accelerator and step on the brakes.
This time is known as “reaction time,” is approximately one second for most average drivers. During that time, the car continued to circulate at speed it was coming, so let’s say that you were driving at 100 km/h as an example. At that speed, a car travels 28 meters every second. It turns out that only when you realize that you have to apply the brake of your car, it already advanced 28 meters at that moment.
For a car to come to a complete stop, a greater distance is needed. I don’t even want to imagine everything that happens during that journey, and in which you inevitably put yourself in danger or, worse still, put others in danger of injury and even death.
Already with the brake applied, a car that circulates, for example, on dry pavement and with optimal mechanical conditions: at 50 km / h, it needs, according to this study, 26 meters to be able to completely stop the vehicle. At 90 km / h, the distance increases to 59 meters, while traveling at 120 km / h takes 92 meters to stop the vehicle. So why drive at high speeds?
Your car doesn’t need high speeds
There is no need. First of all, if you own a car or like to drive at high speeds under the pretext that your car works better, let me tell you that this is fiction. Studies have disproved this myth, which seems to have been created by the automobile industry, to justify its more revolutionized engines.
Speeding shortens your vision
But back to our evolutionary problem and speed. It turns out that our vision is also very limited in the face of speed. This is because, at higher speeds, your field of vision will decrease, reducing your visual acuity. This can cause double vision and miscalculations in distances.
According to a study published by the General Directorate of Traffic in Spain, a distraction in driving at 90 km / h, of just three seconds, means that the person at the wheel drives blind for 75 meters.
As you increase the speed, the images become even more confusing. For real purposes, the angle of your vision on which it depends that we perceive objects and people is reduced. For example, at 65 km / h, the angle of your vision is reduced to 70 degrees, while at 100 km / h, the angle of peripheral vision drops to 42 degrees. At 130 km / h, it is reduced to only 30 °, appearing the so-called “tunnel effect.” For this reason, the visual field depends directly on the speed at which we are driving.
Slowing down can save lives
Many motorists do not like to be limited in the speed that their machines can generate. They complain that the established speed limits are measures to annoy them in their long-awaited race in search of speed or that they have a clear raising motive. Nothing further from reality.
The provisions to implement lower speed limits have a deeper meaning, which has nothing to do with a simple whim, collection, police fees or, as I have already mentioned, with hindering the roar of their engines. No, its reason for being is to safeguard people’s lives.
The theory is quite simple: reducing the speed limit on the roads, in addition to reducing fuel consumption and the emission of pollutants, especially provides greater safety on the road.
Studies have shown that reducing speed limits is a very effective tool to create safer environments for all people, regardless of the means they choose to use to get around. Resulting in roads that are ideal for sharing among all user groups, including the most vulnerable.
This type of initiative, encompassed under the concept of Vision Zero, is clear in its precepts: “There is no acceptable loss of life.” And yes, indeed, roads need to keep moving, but they must also be designed to protect us at every step, step, and even in every car.
It is no coincidence that the most progressive cities interested in safeguarding their citizens are reducing speed limits.
A study published by Smart Growth America identified the results of collisions at different speed limits and the effects they produce on the accident.
There is no single solution to make our streets safer. However, there are proven solutions that we can collectively pursue.
Certainly, implementing lower speed limits is not the only factor in this equation to achieve greater road safety. Stronger enforcement of traffic laws and regulations, the installation of better bicycle and pedestrian infrastructure, as well as the implementation of “Complete Streets”, are becoming more powerful and popular tools among more progressive cities to provide greater road safety to its citizens.
Is riding a bike good exercise?

Riding a bike is a great form of exercise. It’s low impact, it’s easy on the joints, and you can ride for hours without getting bored. If you’re looking for an activity that will help you stay fit but don’t have the time or energy to join a gym, then riding a bike may be for you.
Is riding a bike good exercise?

There is no one-size-fits-all answer to this question, as the best exercise for you may vary depending on your age, fitness level, and other health factors. If you are serious about brakes, I recommend you to try the best mountain bike hydraulic brakes.
While there are many ways to get physical activity in a day, bicycling is an excellent option because it’s both fun and easy. According to a study conducted by the Centers for Disease Control and Prevention (CDC), adults who cycle for at least 30 minutes a day have a lower risk of premature death from any cause than those who don’t ride a bicycle.
The CDC estimates that about 40 percent of the adult population in the United States has not been physically active enough to reduce their risk of premature death. The CDC also estimates that about one in five American adults is obese. Bicycling provides an effective way to get in some physical activity while also reducing the chances that you will become obese. If you are interested in bicycling but don’t know where to start, here are a few tips that may help you get started. Get Yourself Proper Bike Equipment In order to properly use your bike. You need to get yourself some proper bike equipment. This includes things such as 1. A Bike Helmet When riding your bike, it’s important to wear a helmet that fits properly and protects your head. Keep reading https://pluginid.com/is-a-cruiser-bike-harder-to-ride/
Health benefits of riding a bike
- Riding a bike is good for your health. It can help you lose weight, and it’s also great for your muscles.
- Keep fit: Cycling helps you keep fit. It can be a great way of burning calories, and it can also help you stay healthy and in shape.
- Save money: If you live in an area where cycling is popular, you might find that you can save money by taking part in a cycling club. You can use this money to pay for a gym membership or to buy new clothes.
- Get outdoors: You can also use a bicycle to get out into the countryside. You’ll be able to enjoy the scenery, and you can also go on trips with friends and family.
- Improve your mood: Cycling can improve your mood. It can help you relax, and it can also give you something to do when you feel low.
- Save time: You can use a bike to get to work more quickly. You can also use it to get from place to place more quickly. You can cycle to the shops, or you can cycle to the local park.
- Get fit: You can use a bike to get fit. You can ride around the neighborhood, or you can go for a longer ride.
- Enjoy life: You can also use a bike to enjoy your life. You can cycle to the park, or you can cycle to the beach.
- Keep active: You can also use a bicycle to keep yourself active. You can ride to the gym, or you can ride to a friend’s house.
- Prevent illness: You can also use a bicycle to prevent illness. You can ride to the doctor’s surgery, or you can ride to a pharmacy.
Is it OK to bike every day?
Yes, cycling is a great way to get around town, but always be aware of traffic and stay safe. There are plenty of trails for you to explore. Just make sure you check with your local trail-use policy before you head out on the trails.
Safety rules for riding an exercise bike
- Keep your feet on the pedals: It’s important that you keep your feet on the pedals of the exercise bike. If you have any concerns about this, then you’ll want to ensure that you’re wearing the correct cycling shoes. You can also use a pedal stabilizer to help prevent you from slipping off.
- Stay focused: You should be focusing on your workout while you’re riding the exercise bike. You’ll want to keep your eyes on the road and avoid looking at anything else. This will ensure that you don’t crash.
- Avoid distractions: You’ll want to avoid distractions while you’re riding the exercise bike. You can’t take your phone or any other devices with you when you’re riding. You’ll also want to ensure that you’re not using any headphones.
- Check your gear: It’s important that you check your equipment before you start riding the exercise bike. You’ll want to make sure that you’re wearing the correct cycling shoes and that you have a helmet.
- Wear appropriate clothing: It’s important that you wear the correct clothing while you’re riding the exercise bike. You’ll want to wear comfortable clothes that are suitable for exercise. You can also wear a sports bra if you need extra support.
- Keep hydrated: You’ll want to keep drinking water while you’re riding the exercise bike. This will help you stay hydrated and will ensure that you don’t get dehydrated.
- Ride safely: You should ride the exercise bike at a steady pace. You’ll want to keep your heart rate at a healthy level. You should also avoid riding at a speed that is too fast or too slow.
- Avoid alcohol: You should avoid drinking alcohol while you’re riding the exercise bike. You should also avoid taking any other medication that might affect your ability to exercise.
- Make sure you get enough sleep: You should make sure that you get enough sleep before you ride the exercise bike. You’ll want to make sure that you have a good night’s sleep so that you’re ready to ride the exercise bike the next day.
In conclusion, I can say without any doubt that riding a bike is a great form of exercise, and it’s not just for kids. It’s a great way to stay fit and healthy, and it’s also a fun way to get around. Riding a bike is a great way to get out of the house, get some fresh air, and meet new people. It’s also a great way to get to know your neighborhood. If you’re looking for a way to get fit and stay in shape, then a bike is the best way to do it.
How do you clean plastic toys?

As a parent, it’s easy to get overwhelmed by all of the things that need to be done. Between laundry, cleaning up after meals, and keeping the house clean, it’s no wonder that many parents feel like they’re constantly on the go. When you’re running around all day, you might find yourself forgetting about a few of the little things that you need to do to keep your home in tip-top shape. Go through the baby swing for bigger babies.
How to clean baby toys?
Step 1: Wash toys in cold water: Wash toys in cold water. Wash them in a sink, not the tub.
Step 2: Clean toys in hot water: Clean toys in hot water. Put the toys in a pot of boiling water for about 15 minutes.
Step 3: Clean toys in warm water: Clean toys in warm water. Put the toys in a pot of warm water for about 10 minutes. Keep reading https://pluginid.com/how-does-a-baby-bouncer-work/
Step 4: Clean toys at room temperature: Clean toys at room temperature. Put the toys in a sink of lukewarm water for about 5 minutes.
How to clean baby toys with batteries?

Step 1: Dispose of the batteries: When you get a new toy, throw out the old batteries and replace them with new ones.
Step 2: Clean the toy: Take the toy and wash it with warm water. Use soap and let it dry. If you want to be extra safe, you can use a dishwasher.
Step 3: Store the toy: Store the toy in a safe place.
How to clean baby toys with vinegar?
Step 1: Get a spray bottle: Spray bottles are great for cleaning and sterilizing items. You can also use them to store water and other things. You can get spray bottles at any dollar store.
Step 2: Fill the bottle: Fill the bottle with vinegar.
Step 3: Clean the toys: If you want to clean baby toys with vinegar, simply spray the toys with vinegar. Allow the toys to sit for a few minutes and then rinse them off with water.
How to clean plastic toys
Step 1: Wash toys in warm water: If you wash toys in cold water, they will crack. If you wash them in hot water, they’ll melt.
Step 2: Dry toys: Use a towel to dry the toys.
Step 3: Put toys away: Put toys back in their original packaging.
Step 4: Store toys in a cool, dry place: Don’t store toys in the refrigerator or freezer.
The natural method of disinfecting Baby toys
- Disinfecting plastic toys is an important part of keeping your home clean. It will keep your child safe, and it will also keep your home clean.
- There are many ways that you can disinfect your baby’s toys. The most popular way is to use baby wipes. This is a great way to disinfect your baby toys. You can use a baby wipe to clean your child’s toys, or you can use a disinfectant spray.
- The best way to disinfect baby toys is to use a disinfectant spray. You can find these at most stores, or you can buy them online. They’re inexpensive, and they’re easy to use.
- Once you’ve disinfected your baby toys, you’ll need to store them somewhere safe. You’ll need to store them in a place where they’ll be safe, and you’ll also need to store them somewhere that’s dry.
- You can use a plastic container, or you can use an airtight container.
- You should store your baby’s toys in a dry place, such as a garage or a closet. You’ll need to store them in a place that’s not humid. Humidity can cause mold to grow on your baby toys.
- You should also make sure that your baby’s toys are stored in a safe place. You don’t want to store them in the kitchen or bathroom, as these are places where your child is likely to play. You should also make sure that your child’s toys are out of reach, as they can be dangerous if they’re accessible to your child.
- You should also make sure that your baby’s toys are kept away from water. This is because water can cause mold to grow on your baby’s toys.
- Once you’ve disinfected and stored your plastic toys, you’ll need to keep them safe. You should make sure that your child isn’t playing with them. You should also make sure that your child doesn’t put them in their mouth.
- You should also make sure that you’re cleaning your baby toys regularly. You can use a disinfectant spray, or you can use a baby wipe. You can also use a damp cloth to clean your baby’s toys.
Things to consider before cleaning baby toys
- Cleaning is a great way to keep your home clean, but it can also be a time-consuming task. You’ll want to make sure you’re not spending too much time cleaning your home. You’ll also want to make sure you’re doing things in the right order.
- Safety: The first thing you should do when you start cleaning your home is to make sure you’re cleaning the toys in the correct order. You don’t want to be cleaning the toys in the living room and then find yourself cleaning them in the kitchen. That could be dangerous for your baby.
- Bacteria: You’ll also want to make sure you’re cleaning your plastic toys with antibacterial wipes. This will help to keep your baby safe from bacteria.
- Toys: Once you’ve cleaned the toys, you’ll want to make sure you’ve put them away in the correct places. You’ll also want to make sure they’re stored in a safe place.
- Storage: You’ll also want to make sure you’re storing the toys in a safe place. You’ll want to make sure you’re putting them away in their right place and that they’re not going to be damaged by any kind of extreme temperatures.
- Cleaning supplies: You’ll also want to make sure you have all the cleaning supplies you need. You might want to consider buying cleaning products for your home and cleaning products for your baby.
You may also be interested in THE STATIONARY BIKE WORKOUT FOR BEGINNERS
The stationary bike workout for beginners

When we think of exercise, most of us imagine tiring ourselves and after a short while, we want to give up. But, the truth is different for a stationary bike. The reason many people are willing to exercise on them lies in the fact that a stationary bike is indeed a good way to tone your abs and give your body the much-needed aerobic workout. Becoming a stationary bike enthusiast requires that you understand how this tool can shape your body and what you should do to maintain a healthy lifestyle by adding it to your schedule.
Stationary bike workout for beginners
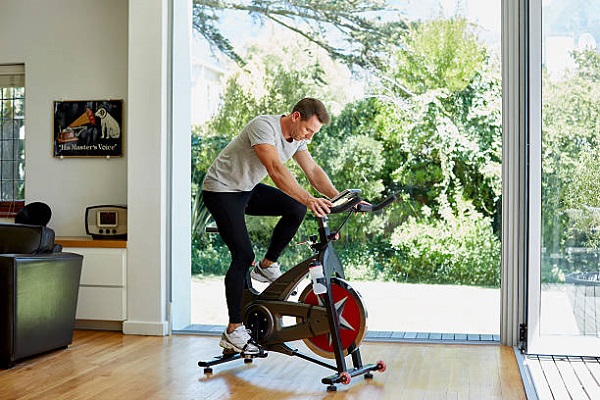
Full length of man working out on exercise bike at home
To get started with a stationary bike workout, it is best to start slow. You can do this by gradually increasing the time and speed as you become more comfortable. Before getting on the bike, make sure that your knees and hips are both straight. Try not to lean too far back or forward while riding, as this will also affect your balance. Continue reading: Best stationary bike stands
For Abs
There are a few basic exercises you can do on the stationary bike, having your abs in mind. These are often referred to as those that go up and down. To start, you can work on the hanging leg lift by simply holding onto the handlebars like a pull-up with one of your legs straight down or coming forward while bringing the other hand around it toward the front to grab hold of pedals (if you have got right side). Pressing hard into handles and pulling both arms back helps keep the core engaged as you use them to stay standing. Keep reading https://hiwindsaruba.com/can-i-put-road-tires-on-a-mountain-bike/
For Shoulders and Chest
When it comes to working the upper body, you can work your chest using a stationary bike by lifting one leg up while bringing the other hand around in front of the shoulder like a rowing machine with bicycle handles and pulling the front pedal toward bands (if have got backside). Your goal is again not strain or muscle fatigue but rather contraction strength that keeps joints stable for the good form where shoulders don’t roll. Your goal here is to get a good workout but with the aim of building upper body strength so that you can increase your cycling speed and power. You can also develop shoulder mobility by pulling both legs up towards the chest as well. Do not do this in rotation as this will put a strain on shoulders when using the other hand holding down pedals or handlebars, which failing to keep blood supply in arms and back while one arm pulls leg away would either pull muscle away from the bone or tear and need extra time to recover.
For Knees
Work the knee using a stationary bike with that area in mind by simply holding handles and pulling both legs up towards the chest as you do so (do this one leg at a time). You can also strengthen your quads when cycling by squeezing them for power during pedal stroke or pedaling uphill through tough terrain such as climbing hills. This can be done by holding both handles in each hand, with the front one higher than the back. Knees bent at about a 90-degree angle and the pedal of the back leg on the guide. You can start your knee workout by going down to the bottom level of pedals and just doing light exercises such as jumping up. Then when you come back up, have heavier pressure such as pushing knees against the floor while keeping other foot somewhat still but enough to allow tension contraction through hamstring muscles powering bike upright. Then as you come back up, play with the speed of going down and coming back up. Lastly, when you go uphill, you can keep your knees slightly bent while pushing the pedal forward.
For Neck
You will want the neck muscles at 90-degree angles from shoulders toward the ceiling but not reaching the highest point in posture. This can be done easily if old legs are placed on top of the seat or bike rim for the elevated position where keeping head still keeps spinal column leaned back. Otherwise, it would be too high standing straight.
You can also perform neck exercises while sitting on the bike by keeping legs arranged as seen above but placing feet on top of the seat or locking two wheels together in place so as to keep a supporting base that keeps the head still and allows this positioning choice which can then just involve getting the upper body up toward the ceiling with complete control throughout the workout. I personally do most real strength bench press and push-ups because they are difficult enough for me to put in and still move up toward the ceiling without allowing any momentum. Also, when doing these two exercises, shoulders are being moved my whole body rather than only arms, so each workout, you will have a broad upper back strength development occurring as well.
I came home the other day after 2 weeks of working on my legs at 6 am and getting 7 hours of sleep, where I was sitting all but completely upright, leaning against the wall, just rubbing leg muscles while watching a movie. That was 0900. Other than that, I have been doing nothing but sitting all day in the same position with 1-2 hrs of chores to look through emails or articles and prepare pre-written responses for later on, so it is not even harsh pressure of climbing stairs at work where all targets should be pushed toward as well besides arm-specific chest pressing due to narrow ranges provided by office chairs.
For legs
After spending 5-sec taking movement, it is clear that the vast majority of all work done on legs occurred in the range 60 degrees and larger, at least 54% of the time I spent engaged working out those muscles by moving forward while sitting, not walking or running.
I was able to do no more than 4 sit-ups in one leg day without breaking my lower back right there only because angle 45-60, I think, has been perfect for me to keep my back straight.
The key to this whole thing is finding the range where you can be most efficient with what you are doing and sticking to that area since your body will do everything it takes in order for anything other than the main goal(s) accomplished. Example: I sit all day with no movement or exercise whatsoever, but I was able to get into some decent ab work by considering as a bonus other exercises being done, which made me not fail on plane 60 degrees and larger. Many people may not come up with this because all focus is on sit-ups which are the first priority.
Best toys to give to children from 6 to 9 years old

It is less and less until Santa Claus and the Three Wise Men arrive at our homes, and parents may not be clear about what toys to ask their children for in their respective letters. For this reason, and as we have been doing for several days in Babies and More, we are going to give you some advice and guidance on the toys recommended for each age.
Is a road bike good for beginners?

Road bikes are a bike that you can use to go anywhere on the road. These bikes are built for longer distances and speeds. Road bikes tend to be more expensive than other types of bikes and have features like disc brakes and drop handlebars. These features make it possible for road cyclists to ride in any weather, whether it is summer or winter.
Is a road bike good for beginners?

Road bikes are available in a variety of styles, so it is important that you choose the type of bike which meets your needs. For example, if you plan to do long rides, then buying an expensive road bike may be worthwhile when compared to more basic models with fewer features and gearing. But for beginners with little riding experience, sometimes there is better value in choosing a basic model or even working up from another style such as mountain biking. Check out the schwinn lightweight aluminum bike.
How to Ride a Road Bike
There are three basic types of road bike: old school, BMX and hybrid. Each type has its own look and feel, but they all share one important thing in common – the ability to ride on a flat surface. So what’s so great about riding a road bike? Keep reading https://charlestonteaparty.org/how-to-wash-an-e-bike/
Step 1: Get training – Road cycling involving high speeds and power can be addictive. So before you start looking at bikes, make sure to train first if your body is not yet used to this form of exercise.
Step 2: Select the right tool – When getting a road bike, it doesn’t mean you have completed all required steps for riding safely on the road since weather conditions change every day. To get perfect control over your newfound hobby, try using handlebar-mounted brake stop or heel guards in your new start. Use hand feeds as well as gears to find the right speed you want while riding safely on the road, even with pavement seams, drainage grates and potholes.
Step 3: Choose local bike routes – When starting out, it is ideal if you do not go straight to Rueda de Prensa training or cycling races since a few hills don’t make any difference to most true road cyclists. Get walking or riding with friends out on the roads and streets first before going pro at local racers.
Step 4: Develop your own style – When starting racing, you will notice that different people have different styles in terms of braking, sweep arm, single speed bikes and so many other factors when going into a race but every racer has his/her own world of riding which is only limited by their own will.
Step 5: Relax on the bike – When riding a road bike, you don’t want people to look at you suspiciously, so do not wear any helmets, sunglasses or even frown upon those wearing these items when going for a daily leisure ride. Slow down, stop and smile – just like your friends that aren’t in the sprinting business of racing but are happy to have their mornings spent rollerskating with mates after a thirty-minute run.
Step 6: Keep your bike well – A minor damage can ruin the day for you, so make sure to protect yourself from such incidents even when just tackling one hill on a ride or taking shortcuts through muddy roads, puddles and ruts. No matter how difficult it is to keep up with the time schedule, proper pressing of breaks as far your hands reach fully down & out of handlebars and your feet planted into the pegs is most important though it takes time, practice and knowledge.
Step 6: Know when to hold back – Another key thing you will learn when racing for a longer amount of time quickly is to know if you have a chance or not at this point present situation then there are several events ahead in weeks, months and even years, etc. Every race has different ups & downs per minute so constantly keep an eye on your forecasts to know if it’s worth all the effort and only race for what you can afford. So high risk & low upside rides could be considered in these early stages of riding cycling clockwise rotation rule is without on some events or finishes.
Road Bike Braking Technique
Road bikes usually have either a front or rear brake. When you’re riding, your left hand should be on the brake lever and your right hand should be holding onto the handlebar in a comfortable position. Apply gentle pressure to the brake levers while keeping a firm grip on the bar.
When you reach an emergency stop, pull both brakes simultaneously until they’re stopped completely. (Emergency brakes will only work on some models.)
What to Look When Riding a Road Bike
Remember, your life is on this bike, so treat it with respect and care. Road bikes can be expensive, but you should go for the best one that meets all of your requirements – look for a nice frame/wheels combination in special colors (ranging from black to deep-blue) or some carbon material if you are willing to spend more amounts. If a manufacturer offers an extended warranty, then ask them about their services as most of the time there will be a little extra cost for that.
Road bikes Best Materials & Collections
So, a good road bike will be made of steel or aluminum frame in wood construction models (depending on how light). They are typically lighter than carbon fiber or aluminum material ones to weight ratio is much lower, so you may need more gear changing if your speed decreases then. Consider this fact when choosing the right setup. In addition, it’s definitely important aspect and value as far as bikes are concerned is their quality characteristics and price. Even the more expensive ones mostly contain high-grade metals that keep them in pristine condition for a longer amount of time. Also, it’s best to go for bikes with specialized gears as far as cycling gear goes – since it’s an expense you will be spending almost every day (some riders have up to 15 thousand miles per year).
Conclusion
While road bikes are excellent for training and racing, they’re not ideal for beginners. Why? Well, first of all, you need to be able to balance on the bike without falling off or losing control. Secondly, road bikes have a higher level of difficulty than mountain bikes and hybrid bikes. Finally, road bikes are heavier than mountain bikes and hybrids. If you can handle those three factors, then go ahead and get yourself a road bike!
How to build a cement pool in just 7 steps!
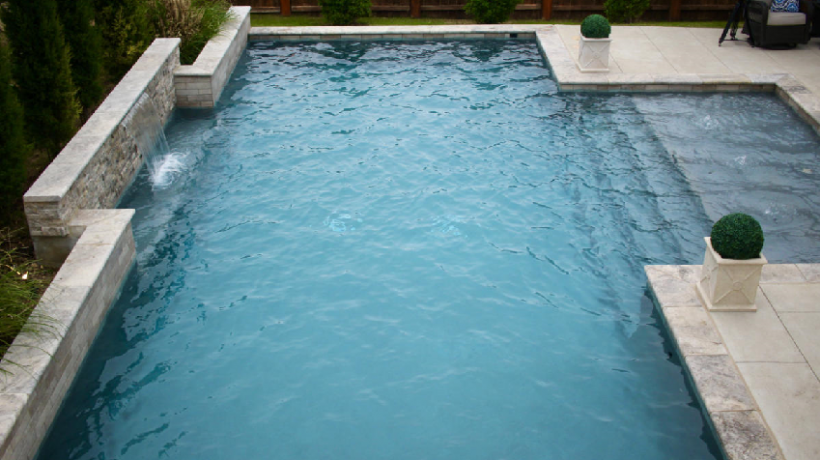
Who would not like to have their own pool in the backyard of the house? The climate of our country allows us to enjoy sunny days outdoors almost all year round, being a swimming pool the perfect place to relax and enjoy the good weather; and this dream is much closer than you think. Believe it or not, building a cement pool in your backyard or backyard is something that can be done if you follow the right instructions. To guide you a bit, we bring you the 7 fundamental steps to build a pool yourself; There is nothing more impressive than a garden with a swimming pool included. Go ahead and build yours!
How To Make A Pool? First, Locate The Right Spot And Start Digging

The first step is to locate the most suitable place to design the pool. This should be the flattest place on the land, away from the plot boundaries so as not to interfere with pipes or the structure of the perimeter walls. Once the place is located, the area is marked to start digging taking into account the desired depth of the pool; remembering that the bottom of it will be approximately 20 cm high. At the end of the excavation, the bottom of your new pool is flattened.
After Flattening, Empty The Substrate
With the substrate completely ready and level, the gravel is poured and then the concrete is poured on it, leaving it in place thanks to the perimeter structure that must be raised before pouring begins. Both the bottom and the sides of the pool must have structural bars so that the concrete can adhere easily and create solid and resistant walls.
Design The Pipes And Build The Structure Of The Walls
With the substrate completely solid, it was time to create the pool enclosures and pipes. In this step, it is worth requesting the help of a plumber to guide you when designing the pipes that inject and pump the water into the pool, these being found between the walls of the perimeter walls. With the spider already designed, we begin to lift the formwork structure to empty the walls. Remember that you must dig a few extra meters to move easily and be able to place all the formwork comfortably.
Empty The Walls And The Perimeter Area
With the formwork for the walls ready. The concrete is poured inside, making sure that it is even, and is poured slowly to prevent air from being trapped and creating cracks in the walls. Once the concrete is dry, the wooden forms are removed and the ground surrounding the pool is filled to level the ground and make it flush with the ground.
Waterproofing And Flanges
The dry and hard cement of the walls will be the canvas on which the pool insulation will be placed. This protective layer ensures that there are no water leaks, making the pool resistant and durable. For the surroundings, the surrounding area that will accompany the pool will depend on your design. A large space to put chairs or loungers or if you do not have much space. Simply make a perimeter structure to give the pool a border.
It’s Time To Cover!
With all the gray work ready, it is time to start with the coating of the external and internal areas of the pool. To protect the interior of your new oasis, it is best to use resin mosaics for their resistance and hardness. While for the perimeter floor, you can opt for pebbles, wooden decks, brushed cement, and even stones such as coral; an ideal natural coating for swimming pools since it does not heat up with the sun.
Customize Your Design With The Final Finishes
Decorating and beautifying your pool is something that should not be missing. From the furniture that will accompany your spaces to the lighting. All these details must be taken care of for an impressive final finish with professional quality. We love this proposal from the designers at Unic Pools. Who created a perimeter with river stones to give this beautiful pool a relaxing, spa-like look.
You may also be interested in HOME DECORATION IDEAS WITHOUT SPENDING A LOT
25 tips for writing a good post

What is the key to success in writing a good post? Nobody has it, but what is clear is that with ideas and inspiration it can be achieved. Do not miss these 25 tips for writing a good post.
Tips for writing a good post

Create A Simple Structure
Do not complicate yourself by thinking about what type of structure to create. Organize the content, the main ideas, the secondary ones, and start developing them.
Know Your Audience
Before you start writing, think about who your message is addressed to. This is what we call buyer personas. Analyze their interests, the type of language they use, etc.
Before Starting To Write A Post, Write Down The Ideas That Arise Spontaneously
Don’t waste them, the best ideas come when you least expect them. If you don’t write them down anywhere, you’ll end up forgetting them.
Create An Editorial Calendar
To keep track of the content you’ve already done, and what you’d like to do in the near future.
Document Yourself
Behind a good post, there is always a lot of documentation.
Write When You Are Inspired, Relaxed And Strong
It will be easier for you to write and the ideas will come out effortlessly.
Experiment
Try different formats and structures constantly. In the experimentation is your future success.
Speak Only Of What You Know
Look for experiences of things you have lived and share them. Forget that opportunist of which you do not have enough background.
Long Content
It works because it increases the time on the page. Try experimenting with long content from time to time.
Enrich The Post With Visuals
Include images and actions that enhance your argument. The examples give a lot of life to the information that we give in content.
Expand The Information With Links To Delve Into Other Topics
We are aware that in a short post you cannot expose everything in great detail, so use external links to other posts that complement the content.
He Talks About Things For All Levels
Try to find new audiences by working on content that is more advanced.
Vary In The Types Of Content You Create
Take a look at these ideas to make different types of posts.
Create Content That Lasts Over Time
More evergreen or timeless content. They will give you more travel in the long run.
Create A Title That Attracts
As it is the first element that the reader will see. It should attract attention, and at the same time synthesize the main idea of the article. It is not so easy to be ingenious and to attract attention at a glance.
Use Short And Simple Sentences
Do not use impossible adjectives or surround the concepts so as not to end up saying anything. Let your text be clear, direct, and very concise.
Watch Your Spelling And Grammar
A text full of meaningless phrases and misspellings will be forgotten.
Always Review And Reread The Post Before Publishing It
If you think it’s perfect, leave a space of time to read it again, you’ll see that small errors come out again that will be easier for you to correct with a second or third objective reading.
Always Highlight The Main Ideas
The first paragraphs of a post should give us the main data to increase the interest of the reader, so always structure the text in small sections and titles to make it more readable.
Make Small Attention Calls
Incorporate small questions at the end of the post to create a call to action with the reader.
Always Write A Conclusion
Make an assessment of the topic you have written about. Give small advice and give your opinion or judgment, summarizing the main ideas of the post.
Be Authentic And Above All Yourself
To get your posts to gain traction, it is essential that you define your voice, your tone, and your style when writing. Do not try to imitate someone’s style or ideas.
Read Your Post Out Loud
It is an exercise that will help you to see if the fluency of the text and the guidelines you make are correct. If you catch your breath when reading, add points, if you notice that your words create confusion, change them for others.
Ask Someone Else To Read Your Content Before Posting It
It is very important that another person gives you their point of view on what you have written and that they be that additional editor that helps you make the content perfect before publishing it.
Don’t Take Anything For Granted
Put yourself in the shoes of your audience, what may be obvious to you may not be obvious to the reader. Do not skimp on the definition of concepts, nor think that they are simple for everyone.
As you can see, writing a post is not an easy task, inspiration does not come from anywhere, so it is very important that you keep in mind that not every moment is perfect for writing.
You may also be interested in HOW TO DESCEND FASTER ON A ROAD BIKE?
How to descend faster on a road bike?

When descending on a road bike, most riders use their big gears to help them slow down and maintain control. While this is effective for many types of riding, it does not work well when the road becomes steep or technical. To descend quickly and safely, try these best bmx bikes for beginners.
If you’re a road cyclist, chances are you’ve fallen off the bike at least once. But even if you don’t fall, crashing is a part of riding in general. In fact, you might think that cycling crashes are so common that they become normal. While it’s true that many cyclists do crash or fall at some point, cycling is actually safer than it was decades ago. Especially if you know how to descend safely.
How to descend faster on a road bike?
- Use your brakes correctly.
When descending on a road bike, it’s important to use your brakes correctly. This means braking gradually and not locking up the wheels. If you lock up the wheels, you’ll lose control and could crash.
- Shift down into a low gear.
When descending, it’s a good idea to shift down into low gear. This will help you slow down. Also, when you’re in low gear, the bike will descend smoothly and safely without causing much stress on your body. Remember to click out of the top gears before going down a steep downhill section so that your derailleur doesn’t shift into one of them automatically (which may cause you to lose control).
- Keep rider smoothly in line with handlebars.
When descending on obstacles like ramps or railroad tracks, it’s a good idea to keep your body as straight as possible. By keeping your bike in line with the handlebars, you’ll ensure a smooth ride and will be able to brake and shift when necessary without needing to realign yourself or the bike.
- Avoid using too big of gears.
Whereas some riders like shifting up into higher gears for long downhills because they can use their full strength on them, this isn’t a good idea. If you shift up into very large gears, your chain will come off of the larger sprockets and increase the risk of falling or crashing.
- Ride with extreme caution.
When riding on extremely steep downhills, it’s necessary to ride cautiously at all times for your own safety—not only could you crash, but other riders may not be able to see where they are going and might crash into you. If there are any areas of the trail that scare you, slow down until those are behind you (or don’t go over them at all). Being safe is far more important than showing off for other riders.
Practicing Your Downhill Riding Skills
Downhill trail sections are great places to practice turning and shifting, braking like a pro, controlling your bike’s speed during jumps or drops, etc. Also, it’s easiest for beginners to practice these skills in an empty parking lot or field.
As a beginner mountain bike downhill rider, it can be tough to know where you should start with your riding skill development. So here is my advice:
- Build muscle strength first. You won’t feel confident on technical terrain until you have developed the necessary fitness and physical strength to go with it. Your body will tire quicker than you feel like it should, so take things slow and build up your strength by riding at an easy pace (not too hard!) for 30-45 minutes on flat terrain every time that you ride. Try not to push yourself when developing strong fitness—if going any faster would make you crash, then just practice shifting and braking skills instead of speed!
- Get comfortable in a straight line before trying to ride tricky terrain at speed. One of the most common causes of crashes when riding downhill is over correcting due to lack of confidence in your bike handling skills and not having enough muscle strength/stamina yet (due to inexperience). So use that as an excuse for going super slow! The more you practice, the better you’ll get—and don’t forget that it can take some time before those muscles grow strong from your weight training.
- Keep your body position relaxed as you ride on technical terrain so if anything unexpected happens, then there will be more room for error before getting knocked off balance by gravity—and also so you can use your body as a spring when bouncing off of rocks or roots. You’ll want to keep most of the weight on the rear wheel for greater traction, but do experiment with shifting your weight forward and back—just remember that it will make you faster if more weight is put on the front tire with technical terrain at speed because less rolling resistance means higher speeds!
Safety precautions
- Wear a good quality helmet that fits snugly and looks cool too!
- Make sure your pads fit well, especially around the knees and elbows—these will prevent nasty scabs or worse from happening if you bail off of your bike.
- Use shatter-resistant sunglasses/goggles to protect your eyes from bugs, dirt and other things that may come flying towards you while riding downhill (and during crashes!).
- Wear good quality shoes that fit snugly and offer traction for riding on slippery soil (or avoid slick terrain), so you don’t slip or twist your ankle!
- Always wear gloves—even when it’s cold because there are still plenty of things to hit while biking downhill super-fast, like sticks from the trees above.
- Always have your cell phone in a good-fitting pocket so you can call for help if something bad happens—or just to let people know exactly where you are and that you’re chillin’ at the bottom of some amazing trails!
Conclusion
Descending faster on a road bike is one of the most important skills you can learn as a cyclist. This skill is required in any type of cycling, and it’s especially crucial when riding down steep hills or big drops. To master this skill, you’ll need to have an understanding of how to use your bodyweight properly while descending and understand how gravity works on a bike. You’ll also need to be able to keep control of your speed while descending, which means having good brakes and a strong leg power that allows you to put all your energy into each pedal stroke.
Keep Reading: How to Adjust Cruiser Bike Handlebar
How to install rear mountain bike wheel?

A rear wheel is an essential part of a mountain bike. It is essential because, without a rear wheel, you can’t ride the bike. However, installing a new rear wheel on your mountain bike is not as easy as you think. Here are some things that need to be considered while installing a new rear wheel on the best beginner mountain bikes.
If you are thinking of installing a rear mountain bike wheel on your bicycle, then this article is for you. This article will tell you everything about the front and rear mountain bike wheels.
How to install a rear mountain bike wheel?
To install a rear wheel on your mountain bike, you’ll need the following tools: a spoke wrench, a screwdriver, and an Allen key. Follow the steps to install the rear mountain bike wheel.
Step 1: Remove the wheel
First of all, keep your eye on the rubber protection called Star Bolt. Take it out with a small screwdriver or a flathead screwdriver and bend it back where you can remove the bolt easily. This has to be done during initial mounting because once mounted, these things are not going to come off so easily anymore and more force is required for removing them later on in the future.
Step 2: Remove front axle nut
With this step, remove the wheels from the bike. This has to be done so that you don’t damage any part of your frame when removing the wheel or derailleur gear afterward and this is particularly important if it’s an expensive high-end aluminum-framed mountain bike.
Step 3: Remove front fork
If you are riding on tough terrain, then remove the front fork as well because some forks can be damaged or get twisted off. You have to use a hex wrench or Allen key nut socket tool during the removal process.
Step 4: Remove derailleur and rear wheel assembly from the frame
With this step, you remove all the stuff associated with your front drives, including chainstays, shock towers, etc. Because if you don’t do that when you remove the wheel and derailleur assembly, then it may break or damage your front suspension. For example, if you don’t take care of the frame, then after removing the rear wheelset from its frame, certain parts become very sensitive to scratches and dents, so don’t leave this act for last because once these things are damaged, it can cost a lot in future troubleshooting related to repairing the bike, etc.
Step 5: Remove axle now
This step is mighty important because sometimes you may have to keep the bike standing in order not to break anything. With this step, either remove the bottom bracket spindle or crankset completely from the frame, which means removing them with pedals attached too or just after finishing using the wrench.
Step 6: Remove rest of parts, including seat post clamps, etc
Use a proper tool so that when this work is done properly, then you can safely hold the bike. This will help to prevent any accidents which may cause damage by accident, like from dropping down with heavy parts or objects.
Step 7: Remove the bottom bracket and seat post clamp
Now, this process will be a little bit tough, but if a person takes care of all other things, then that shouldn’t prove much difficult for anyone at all because in case there are no problems like dropped tools, etc. then it’s time to don’t be procrastinating over this process and give ear to the sound made by your bottom bracket while turning.
Step 8: Remove seat post
Now, you will find that when removing a bolt from the frame, all parts of the bike are disassembled in pieces cause it is better to remove seat post clamps acting as support for the holders, which are normally used with seat posts and so using these clamps can help you pull loosen or remove the Seatpost then pull it out to about 10 cm – 15 cm from the frame, don’t remove any further than that.
Step 9: Remove Bottom Bracket spindle
These are a special type of bolt which is more difficult because now you got a thread locker needed for the bottom bracket spindle so find thread locking compound where and play around with this on the cylinder but make sure there’s no chance of getting damaged lug or backing plate with this so, before starting put a bit of grease or oil on the thread and also should ensure that it has almost no tension in between what leaves pedal arms.
Step 10: Install the new wheel
Install bottom bracket lock ring and crank arms. Ensure the posts work fine. If you can’t feel any rotation in them, then check for looseness between the splines of your hub shell and spin on both ends of these with two wrenches before tightening further. Check again if all works well without any wobble and nobody can remove bolts while rolling, then you’re fine. Next time goes to your bike shop and purchases the new cassette, if necessary ready for installation.
Reinstall crank arms: Before installing the bottom plate, grease all splines where they will be screwed into the bolt. In between, this is a very common mistake even well-known people do, so make sure to grease or wipe only the places where the bottom bracket attaches with crank arms.
What to consider before installing a rear mountain bike wheel?
Check the load capacity of your rear tire; this is important because it keeps in place the wheels or on tilt you may not even notice, but if there’s an exact moment to wobble out, then which one can give you a break again.
Check needs, gear range and only use strong/resistant tires that will have enough stand against bad weather conditions and other issues so, before purchasing mountain bike wheel tires check their corresponding size and go for those items from a shop that they’ll have good range and offer to help you with your choice.
Equally, you should check at least the weight of the entire wheeled system as well. This will also ensure if it is appropriate for the standard rider or not because most mountain bikes have a flexible bottom bracket where everything works very gently. In case you’re feeling like going downhill on the road, then rattling noises will definitely become another disaster for these wheels, so I would personally suggest to use the weight of wheel + item itself.
For those who don’t know, this is a how-to guide for installing a rear mountain bike wheel. This is a good way to learn about the best ways to install a rear mountain bike wheel.
Keep reading: How to start mountain biking?
The definitive guide to making video tutorials

If you have a business, video tutorials are an essential part of selling your product or service. According to Forbes, 90% of users say that product videos are useful in the decision process, and video tutorials are one of the 3 most effective types of online video content.
More and more people are turning to social platforms like YouTube and Instagram to learn more about a business or how to use a product. That’s why it’s so important to create a great video tutorial that clearly explains what you do and how customers can use your product or service.
Whether you’re shooting your own video or sponsoring influencer content, this article will walk you through step-by-step how to create an engaging video tutorial that is useful and looks great.
- How to show your product in a video
- A step-by-step guide to creating video tutorials
- Distribute your video tutorial on the right channels

How to show your product in a video
Take some pictures
If you haven’t already, now is the time to take some quality photos or videos of your product. If you’re not sure which camera is best to use, check out this article on the best video cameras for beginners. You want to make sure that your product is shot in good lighting using these techniques and that the footage won’t move with a gimbal or tripod. Try recording a video of someone showing your product step by step, or going over its features and benefits.
Make a screen recording
If you are creating a screen recording, we recommend that you use the Quicktime screen recorder
on Mac or the built-in screen recorder for Windows. Make sure to move the mouse slowly and perform each movement smoothly to ensure that viewers can easily follow your recording. You can also record your voice using Simple Voice Recorder for Mac or Windows Voice Recorder
Make sure you speak clearly into your computer’s microphone – you don’t feel too close or too far – and do some tests to make sure you can be heard well.
Create a video slideshow
Take some photos of your product or people using your product to use in your video slideshow. Make sure the images are clear and show your product in the best light.
Here’s a step-by-step guide to creating amazing video tutorials
Go to Clipchamp’s free video editor
When you have gathered all the images and are ready to start creating your video, go to the video editor in the Clipchamp browser to start creating your video tutorial. You can sign up for a free Create account and get started right away.
Start a new project
Click start new project to begin.
Select the aspect ratio
Choose the aspect ratio for your video. We recommend using a wide format (16: 9) as it is perfect for YouTube videos and easily adapts to any screen recording.
Add your footage
Drag and drop or browse to add your footage or recording to the library. Create’s video editor automatically saves your projects as you go, but if you close the editor, you may need to relink your files.
Create an introduction
Begin your video tutorial with a 5-second introduction. Every video tutorial you create should have a memorable and entertaining introduction.
Add your footage to the timeline
Select your multimedia footage and drag it onto the timeline. Put it in the order you prefer.
Crop your video
Use the Split Clip tool to reduce the footage to your preferred length, or drag the highlighted blue bar to shorten the clip. Make sure the clips are not longer than necessary.
Speed up your video
If you think your video tutorial is too slow, speed it up with the Clip Speed tool. There are three speeds to choose from, slow, normal, and fast.
Add a closure
After completing the tutorial edit, add a closure to your video. It can be as simple as an overlay of text to the last existing clip in the tutorial or adding an additional stock or media file. Thank your viewers for watching the video, add your brand, social media, and website links.
Add background music and a voiceover
Let’s go with the audio. Browse the stock audios and choose a soft and relaxed piece of music that doesn’t overpower your voice-over. Make sure to change the volume level when you have inserted your music into your timeline and progressively decrease the volume at the end.
Add transitions and effects
Add some cool transitions between your clips, especially after the intro and before closing. Filters and animations can be added once you’ve selected your clip. Transitions and effects will bring your tutorial to life and make it more visually pleasing to viewers.
Export your file
Finally, exporting your video tutorial is the final step to complete it. You can find the Export Video button in the upper right corner of your screen. You will then be given three resolution options, standard definition (480p), high definition (720p), and very high definition (1080p). If you are uploading it to YouTube, very high definition is recommended.
Distribute your video tutorial on the right channels
Share on social networks
Clipchamp now offers the option to “Share your video” when it is exported. This feature allows users to easily share their creations through social networks: Facebook, Facebook Messenger, Reddit, and WhatsApp. An easily accessible link is also presented so you can use, copy, share and save it forever.
Embed in a blog or website
Clipchamp also offers an easy-to-use embedded link for users to paste onto their website or blog. It’s as simple as clicking the “Embed” button under the “Share your video” option.
You may also be interested in HOME DECORATION IDEAS WITHOUT SPENDING A LOT
How to adjust the rear derailleur on your bike?
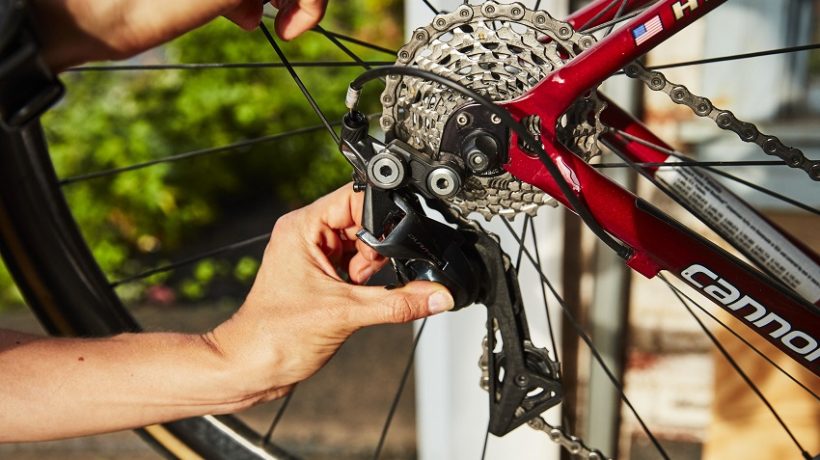
Nothing like a few gears running efficiently to make your rides more enjoyable. Although at first glance it seems too complicated, actually adjusting your rear derailleurs is relatively easy. Here we will tell you how to do it. You should adjust rear derailleurs if there is something wrong with them. At first, it might not be apparent as a common practice that we need to change our bikes’ gears. Once you notice some clutch slippage and problems shifting asymmetrically, then you can decide on changing the rear derailleurs release or even your wheel side pull brake cables too.
What is a rear derailleur in the bike?
Rear derailleurs are also commonly known as gears and shifters. Rear derailleurs in bikes can be fitted to use, but you need a special cable for them, which is called a rear derailleur release (RD). You can see the best quality front and rear in the best fat bikes under $500.
This RD comes with two wires. One wire has no purpose. But one of these wires that fit on the frame must have contact directly to each ring gear at the same time. That way, we can transmit force to the rear wheel.
Tools needed
- Small screwdriver
- Allen keys
Rear derailleur adjustments
- Limit screws
- Whip tension
- Vertical tension screw (on some mechanisms)
Limit screws
The rear derailleurs have a pair of screws that serve as physical stops to regulate the operating range of the mechanism. They are usually marked one with an H (High) for the smallest sprocket limit and L (Low) for the largest. Adjusting these stops ensures that the chain does not move past the end sprockets.
Whip tension
The position of the derailleur is controlled by the tension of the whip that connects the controls to the mechanism. The vast majority of the mechanisms are “Normal High,” and as they do not have tension, they pull the chain towards the smallest sprocket, that is, towards a high speed. It is possible to find mechanisms that push towards the largest pinion by not having tension on the whip (Normal Low). Having adequate tension ensures that the derailleur selects the desired sprocket, that is, that it is well-indexed.
Vertical tension screw
This screw regulates the vertical distance between the pinions and the guide pulley. The idea is to keep the idler as close to the sprockets and to shift more efficiently. It is important to note that not all mechanisms have this setting.
How to adjust your rear derailleurs?
In order to make the adjustments properly, it is recommended to position the bicycle in such a way that the rear wheel is in the air and can rotate freely when pressing the pedals. Additionally, you should be able to control the controls while pushing the pedals. Ideally, you should mount the bike on a workshop stand, but it is not necessary.
The procedure that we share below is to adjust “Normal High” mechanical derailleurs since these are the most common and it is similar for mountain and road bikes.
Before starting, it is important to check that your mechanism (pulleys and cage) are perfectly parallel to the pinions. If not, it is very likely that the leg (Hanger) is bent and it is necessary to straighten or change it.
Adjust the H and L limits
- Release the whip – Using the controls, select the smallest pinion, and with the Allen key release the whip.
- Adjust bolt H – When driving the wheel with the pedals, the derailleur will tend to move the chain towards the small sprocket. Tighten or loosen the limit screw H so that the chain stays at the highest speed (smallest sprocket) without making noise and without coming off. Make 1/2 turn adjustments for more precision.
- Adjust the L stop – Screw in the L stop fully and push the mechanism by hand (remember that the whip is not attached) towards higher speeds while turning the pedals. With the screw all the way in, you will most likely only get to the second or third sprocket.
- Unscrew the stopper L little by little – While driving the wheel with the pedals, turn the screw 1/2 turn at a time until the derailleur moves the chain to the largest sprocket. Once the idler pulley is perfectly aligned with the pinion, the lowest speed stop is adjusted.
- Extract the maximum length of the whip – Place the knob in the position corresponding to the smallest sprocket and pull the end of the whip.
The tensioner (barrel screw) is used to give a fine adjustment to the tension of the whip. Screw-in the tensioner as far as it will go, and then turn it two turns in the opposite direction so that you have room to play with the tension.
- Attach the whip to the mechanism – Place the whip, ensuring that it is in the correct position and tighten the screw. Don’t over-tighten, as you could damage the whip.
- Test the tension setting – Using the knobs, try to shift to the next sprocket. You will probably notice that the chain makes a bit of noise, cannot make the change, or skips more than one sprocket.
Tighten or loosen the tensioner as needed so the derailleur makes a single shift with each click of the knob. If it shifts correctly but makes too much noise, give a slight adjustment with the tensioner to align the idler pulley with the pinion. To ensure accurate adjustment, it is recommended to turn the barrel screw ½ turn at a time.
If the chain is trying to change more than one sprocket at a time, you will need to release some tension.
If it is difficult to change to the next sprocket, you will need to give more tension to the whip.
- Adjust the vertical distance – With the controls, select the lowest speed (largest pinion with the smallest chainring) and adjust the vertical tension screw.
When screwing, the mechanism moves away from the pinions and when unscrewing, it is closer.
The ideal is to leave it as close as possible, without making noise, about 5 mm more or less, depending on the characteristics of the mechanism you have.
As you can see, alignment and tension are essential for your changes to work well. If you can’t adjust your gears correctly by following the steps above, make sure that the derailleur leg is not bent and that the whip and lining are clean.
How to start mountain biking?

Mountain biking can be a great way to get outdoors and explore the beautiful countryside. However, if you’re new to the sport, it can be tricky to know how to start mountain biking. In this blog post, we’ll look at some of the basics you need to know before hitting the trails. We’ll also recommend some beginner-friendly mountain biking trails in your area. So, whether you’re an experienced cyclist or a complete beginner, read on for everything you need to know about getting into mountain biking!
Steps to start mountain biking
Choosing the right bike for mountain biking
There are a few things you need to consider when choosing a bike for mountain biking. First, you need to think about what kind of riding you plan on doing – if you want to make both cross-country and downhill trails, then it’s best to purchase two bikes that suit each style of riding. You’ll also need to think about the size and weight of the bike, as you’ll be carrying it around on your shoulders for long periods of time. You find lots of best mountain bikes under 1000.
Safety guards and gears
Mountain biking can be a dangerous sport, so it’s important to wear the right safety gear. This includes a helmet, gloves, padded shorts, and sturdy shoes. It’s also a good idea to invest in some cycling glasses, as these will protect your eyes from bugs and dirt.
Basic mountain biking skills
Now that you’ve got your bike, it’s time to learn the basics of mountain biking. Here are a few key skills you need to know:
– How to brake safely and effectively
– How to corner correctly
– How to ride over rough terrain
Once you’ve mastered these basic skills, you’re ready to hit the trails!
Balancing skills
One of the first skills you’ll learn is how to balance on your bike. This is crucial, as it will allow you to go faster and prevent falls. Once you’re comfortable balancing on your bike, you can focus on pedaling and shifting gears.
Learn shifting gear
Mountain biking involves a lot of shifting gears, so it’s important to learn how to do this correctly. If you shift gears at the wrong time, you’ll lose momentum and might even fall off your bike.
Start on easy trails
Now that you’ve learned the basics, it’s time to hit the trails! However, it’s best to start with some easier trails, as these will give you a chance to get used to your bike and learn more advanced skills. You can always move on to harder trails once you’re ready!
Momentum maintaining
Once you’ve mastered balancing and shifting gears, it’s time to learn about momentum. Once you’re going fast enough, you’ll need to shift your weight onto the back of the bike so that it propels forward. This can take a while to get used to if you haven’t done this before!
Wearing habit of helmet
Safety first! Most mountain biking accidents happen because of a head injury, so you should always wear a helmet when riding.
Learn how to brake properly
As mentioned earlier, mountain biking requires a lot of braking. If you don’t brake correctly, it’s easy to lose control and fall off your bike. Make sure you’re wearing gloves while you learn how to brake.
How to corner correctly
Cornering is very important for mountain biking, as it can help you keep your speed up and avoid obstacles on the trail. Be careful not to lean too much while cornering. Otherwise, you’ll put yourself at risk of falling off your bike!
Stay hydrated
Last but not least, remember to stay hydrated while mountain biking! Dehydration can lead to dizziness, nausea, and even serious health problems. Make sure you bring plenty of water with you on your rides.
Weight shifting on the trail
Weight shifting is another crucial skill to learn on the trail. You’ll need to shift your weight for certain turns, so you either lean into or away from them depending on whether they’re sharp or wide.
Suspension
Suspension is one of the most important aspects of mountain biking, as it absorbs shock and prevents you from getting injured. Beginners should start with hard suspension, which provides more stability on rough terrain.
Use all gears
Mountain biking involves a lot of shifting gears, so it’s important to use all of them. If you only use a couple of gears, you’ll lose speed and power.
Once you’ve learned all these skills, it’s time to enjoy the ride! Take your time and practice on easier trails until you’re confident enough to tackle the more challenging ones. Have fun and stay safe!
Basic techniques to start mountain biking
There’s a lot more to mountain biking than just hopping on your bike and riding off into the sunset. In order to get the most out of this exhilarating sport, you need to learn some basic techniques. Here are a few tips to help you get started:
Mountain biking is all about confidence – if you’re not sure of yourself, the trails will eat you alive. Be aggressive and take on obstacles with gusto – as long as you know what you’re doing, you won’t get hurt.
One of the biggest dangers while mountain biking is losing control of your bike. Stay aware of your surroundings at all times and be prepared to brake or steer away from any obstacles that might appear in your path.
When cornering, it’s important to lean into the turn. This will help you maintain your speed and avoid losing control. If you’re going around a sharp turn, lean as far as you can without tipping over.
You’ll need to shift gears frequently while riding, so it’s best to practice this beforehand. If you aren’t used to shifting gears, your momentum will decrease and you’ll lose speed quickly. Shift down a gear before a hill to make climbing easier, and shift up a gear when you’re going downhill to maintain speed.
One of the most important skills to learn is how to brake properly. If you hit the brakes too hard, you’ll lose control of your bike – but if you don’t brake at all, you’ll end up crashing into whatever’s in front of you.
Conclusion
If you’re not sure where to start, mountain biking is a great activity for all levels of skill and fitness. The trails are challenging but rewarding, the scenery is beautiful, and the equipment is relatively inexpensive compared to other types of cycling activities. Mountain bikers can be found in urban areas or on remote routes – do some research about your local area before heading out!
Home decoration ideas without spending a lot

Do you want to decorate your house and you don’t have much money? Cleanipedia can help you! Discover the best tips for home decoration without spending too much, recycling objects that you have, or changing the furniture to give a new look to your home.
Do you want to decorate your house but it does not give you the budget? Many times we think that home decoration is expensive and almost impossible to do with little money. In this article, we show you the opposite. There are several simple and original ideas to give your house a new image.
Before changing your home décor, use CIF Floors 2 in 1 to leave floors clean and fragrantly fresh. Are you ready? Get to know all the ideas to decorate the house without spending a lot.
How To Decorate A Small Living Room With Little Money
It is possible to decorate the living room of your house without spending a lot, you just need a little imagination. Meet the following ideas:
I Light Candles
This is one of the easiest and cheapest ideas to decorate the house. Candles create a warm and welcoming atmosphere. Put them in the centerpieces and light them. You are going to see how with that little detail the living room changes completely.
Decorate With Natural Plants Or Flowers

A good idea for home decoration is the use of natural plants or flowers. You can recycle your glass jars and bottles, and turn them into vases for your counter or place them in the living room. Dare to do it! In addition, plants give us oxygen and fill our house with good energy.
Swap The Photos
This idea is very simple and effective. By changing the photos of the picture frames or pictures of your house, the environments will change. You can do this every 2 or 3 months so as not to get tired of seeing the same photos and, incidentally, you are renewing memories of the house, of how the children grow, of your pets or of the trips you made. It’s always cute, so go ahead and do it!
Move The Furniture Around
Looking for cheap ideas to decorate the house? Start with the simplest. Move the sofa, the table, change the chairs or the rugs and you will see how your environments will look different without spending a dollar. It is a great way to decorate without spending anything.
Take Advantage Of The Paint You Have
You don’t have to completely paint the walls. We advise you to use the excess paint that you saved from previous occasions -preferably neutral tones for a small living room- and with this, you give a touch of color to your chairs, shelves, pictures, centerpieces, etc.
Ladder As A Shelf
The painter’s ladders are very good when decorating. You can put the ladder in the environment of your choice, open it vertically in the bathroom to hang towels, hang vertically on a wall to use as a shelf, or even pass wooden boards between the steps and create a shelf for your books. favorites.
Ideas To Decorate The House By Recycling
“How to decorate my house without spending a lot?”. Surely you already asked yourself this question. Nothing better than thinking about a new decoration and recycling objects that you have in your home. We share the following suggestions:
First Things First: Clean And Tidy Up

Before we start decorating our house, it is important to clean, order the different rooms and also discard those objects that no longer serve us so as not to accumulate. To clean all types of surfaces, you can use a cleaner like CIF Ultra Gloss.
Ideas To Decorate Your Room Without Spending A Lot
If you don’t know how to decorate a room without spending money, don’t worry. There are many decorating tips to decorate your room. One of them is to use wooden pallets as a backrest for the bed or to make a coffee table. Another idea is to use concrete blocks, stack them and create a night table or a base for a bench or armchair. You can also make paper flowers or different origami shapes to decorate the walls. Now you know how to decorate your room without spending a lot of money.
Christmas Lights For Home Decoration
Instead of storing the Christmas lights, you can use them all year round to give a warm touch to your environment. I put Christmas lights on the balcony, in the garden, and even on the back of the bed. This type of home decoration is widely used today, especially for the most intimate environments.
Cushions With Your Clothes
Sometimes it happens to us that we love a shirt or sweater, but at one point it gets stained and we don’t know what to do with it. Try turning your clothes into pillows for your home. You can decorate them with studs, beads, or even embroider them, and you will continue to see your favorite clothes in your favorite place. Learn how to recycle clothes and transform your clothes with this step-by-step guide.
The Dishes Are On The Wall
Another inexpensive home decorating idea is to recycle your dishes. Do you have an incomplete dinnerware set with nice motifs? Gather several plates of different sizes and place them on the wall with small wire holders. This type of decoration is ideal for the walls of the kitchen or dining room.
Sort Your Books By Color
Have you ever tried to sort the books by color? If you have a library insight in the living room, take the opportunity to do so. It is not necessary that you order all the books by color, you can do it in a single sector of the library. You will see that the effect that is created is very original.
Decoration With Plastic Bottles
You can use them as multipurpose containers. Cut any plastic bottle in half and it will be ready so you can start using it as an organizer in different spaces of your house. You can also use them as vases or glass holders. The important thing is that you use all your creativity to decorate them as you like. Try to line the edges so they are not messy and sharp.
You may also be interested in 5 ADVANTAGES OF USING TECHNOLOGY IN EDUCATION
How to clean a cool mist humidifier? Step by Step
Cleaning a cool mist humidifier is important to prevent mold or mildew growth so they will be the safest and best humidifier for baby. A cool mist humidifier wick filter needs to be cleaned every 2 weeks to prevent residue from building upon the surface of the water tank. The following simple steps will show you how you can clean a cool mist humidifier easily at home.
How to clean a cool mist humidifier?
Step 1: Fill the humidifier with white vinegar
Use a measuring cup or gallon container to fill your cool mist humidifier tank with undiluted white vinegar. Use only distilled water after this process. Run it for 10 minutes, then turn off the unit and discard the vinegar solution.
Step 2: Bleach cleaning
Pour one-third cup of bleach into the cool mist humidifier tank, then run it for 10 minutes. Turn off the unit and discard the solution afterward.
Step 3: Rinsing
Use a measuring cup to fill your humidifier with water again. Run it for 5 minutes, then turn it off and discard the water mixture from the tank.
Step 4: Drying
Allow the tank to air dry. If you are running low on distilled water, fill the tank with tap water one last time and allow it to run for 10 minutes, then turn it off. Turn your cool mist humidifier upside down over a sink or garbage can and drain any excess water collected in the base before using it again.
Step 5: Cleaning the wick
Use a clean paper towel or rag to wipe off the surface of the water tank and remove any mineral deposits. Use a cotton swab to clean out the hole where the mist comes out.
Reassemble your humidifier once it is completely dry. You have now successfully cleaned a cool mist humidifier.
Humidifiers and vaporizers can be a great addition to your house during the dry and cold winter season. But if not cleaned regularly, these humidifiers and vaporizers can be a haven for fungus and other bacteria growth. If you want to prevent breathing problems in the baby due to this mold formation, take care of your cool mist humidifier and clean it regularly. The Pro baby guide will help you to properly take care of your baby.
Things to consider before cleaning cool mist humidifier
- If you want to extend the life of your cool mist humidifier, turn it off when you leave home or go to bed.
- Ensure there is space around the humidifier for air circulation and no curtains or furniture near the unit.
- Keep children and pets away from the cool mist humidifier. Some children are tempted to drink water from the unit.
- To reduce white dust, clean the wick filter every two weeks. Do not use bleach or any chemicals to clean the cool mist humidifier.
A wick filter is designed for maximum performance and should be replaced once it wears out after 2-3 months of regular use. It may be time to clean or replace your wick filter if you smell a moldy smell in the air when the cool mist humidifier is on.
If you are bothered by the humidifier’s white dust particles in your house, use demineralization water tablets in the reservoir instead of distilled water. These will reduce white dust without affecting the humidity output of your humidifier or spreading bacteria and germs.
You can also reduce white dust by cleaning the unit regularly. To do so, first, use a measuring cup to remove any excess water from the tank. Then mix one part vinegar with three parts tap water and pour it into the cool mist humidifier base. Let this solution sit for 10 minutes, then turn the unit on and let it run overnight. Discard this cleaning solution in the morning and fill the tank with distilled water before using your cool mist humidifier again.
Humidifiers and vaporizers are a great way to add some humidity during the dry winters. But they can also be a haven for bacteria and mold formation if not cleaned regularly. Make sure you follow these steps before cleaning any cool mist humidifier at home. If the problem persists, call a professional.
How old is Doja Cat?

Doja Cat, a rapper from Los Angeles, has hit the scene with her refreshing sound and unique flow. In “Mooo!” she sings about how much she hates cows. In “So High,” she romantically raps about smoking weed alone under the moonlight. In “Social Media,” she reveals the inner workings of her mind as well as those of society and the effect it has on both.
Things To Know Before You Buy A Hardtail MTB

Now here we have discussed some amazing facts about the Hardtail Mountain bikes. A hardtail bike is an amazing biking option and there are some facts you should when you going to buy a Hardtail bike.
There’s something about the hardtail bike that just learns you back in, and that’s exactly what we’re going to be talking about today I’m going to share.
Some great things that you should know before buying and getting into the hardtail MTB.
Fastness and Efficiency
If you looking for fast and efficient riding, then a hardtail could well be the one for you from everything from xc carbon race, thoroughbred bikes, right?
The way through to this steel-framed bruiser and that’ll take anything that you can. Whether you’re looking for something for fitness, winter riding, I mean, look at a state of MI, or general all-around training.
The hardtail is definitely the way to go and I think because, well, you’re not lugging around any extra or unnecessary weight if you don’t want it like suspension and bearings and linkages and things like that.
When people think about differences, they literally think about full suspension vs hardtail bikes.
And also, it’s solid by that and so all that power that you put out through the cranks is driving you forward.
You’re not going to bother as if you were on a full-suspension bike. So that’s surely got to be another plus and something worth thinking, you know that’s a great example of this sort of efficiency and almost hardtail is making a comeback.
If you like, is this year’s cross-country world champs. Now a lot of riders starting to use dropper posts, which is fine and full suspension.
Cross-country bikes, which always seem commonplace nowadays. But actually, people like Nino shirt, uh, Pauline from Provo and Mateus.
All posted amazing results all on a hardtail. So, I mean you know there’s got to be a bit of science in there somewhere it’s right.
Great for Learning
It’s a well-known fact that hardtails are great for learning skills, especially when you start riding. So it’s somewhere I’d strongly.
You begin with they’re very good for honing in all those little skills and techniques that you’re going to use later on in your cycling career. So, pick up a heart out and start there.
I would things like pumping, jumping and cornering skills are all best learned and places. On a pump track on a hardtail. They’re really going to make you ride nice and smooth.
Life’s cheaper when it comes to hardtails. Now, not just to maintain, but also to purchase, uh, and actually can be a big way.
When it comes to thinking about buying your first oil next bike, whether you need a bike rolled up, bounce out the back, or something a little bit more solid.
So not only are hardtail frames cheaper to manufacture and produce, they’ve got a lot fewer moving part.
So, actually, the production process is a lot simpler, but you don’t have any extra costs when it comes to that time of the year after winter when it started looking like.
Everything’s crunching and grinding away. You don’t have shocks to pay out to service bushings, bearings. None of that is going to need replacing so actually they’re just an all-around much more cost-effective.
Less Maintenance
you can’t be good old simplicity and that’s exactly what you get from a hardtail. Just unequivocal. Unmatched simplicity, nothing to go wrong really?
Let’s start at the front end there. I mean, it looks like a normal bar and that’s because it is, you’ve got two breaks. You’ve got your dropper lever, your shifter, your suspension.
It’s all there. Look at the back end and there’s virtually nothing to go wrong here. It’s about as simple as you’re going to get on mountain bike riding skills.
There are no bearings or pivots or bushings or anything like that. No moving parts compared to a full-suspension bike and we’ve got all. We got our one-by setup and a disc brake outback.
When you going on a hardtail that is about all you need to maintain. Uh, there’s not even a front Mac because of Mexia.
So maintenance minimal and good old-fashioned steel you can clean lines. Like these are what makes hardtails and it’s so great and another reason why you should think about getting into them.
Coolness of Hardtail Bike
You will smile when you ride a hardtail that’s a cold thing that you know. I can’t even stop smiling now just thinking about ride me out. I don’t know what it is, but something about them.
Their sort of throwback, their simplicity. They’re just amazing fun to ride all the time and we’ll always put a big old smile on you.
Time-traveling fun fact I don’t mean quite a dark brown kind of way, but pretty close. Do you remember that time?
Probably when you started mountain biking, when you were a kid and you had that beaten up older hardtail and you thought it was amazing, you did every fan on it.
I certainly can. I had an old beaten-up rally, which I used t shred too, with an inch of its life, or at least I like to think so.
This is like doing that all over again and it’s rattling down the trail, transforming those tracks into well, what they used to be when you started riding is what it’s all about.
It’s sort of bringing back the early days and the ethos of mountain biking, which is another great selling point.
I think of the heart. And it is well worth knowing if you are going to get one, like I said, for the first time, or if you’ve been riding a full PSA for the last 20 years.
Go back in time, get your hardtail out and that was great fun there. You have it and then there are some fun things to note before you go buying a hardtail.
Conclusion
Thank you very much for reading as always and don’t forget to hit the like button and enjoy your happy riding, stay safe and I’m off to travel back into the park.
If you want to learn more biking tips you can visit OutdoorXsports for more biking information.
How to germinate adenium seeds?

Adenium obesum is a flowering plant in the dogbane family, Apocynaceae. It is native to East Africa and Yemen but mostly grown as an ornamental plant in warm regions around the world. It is commonly known as the Desert Rose or Sabi Star (from Saba, an island in Yemen). In this article, we will discuss how to germinate adenium seeds?
How to germinate adenium seeds?
- Firstly, you need to obtain the seeds from fresh adenium flowers. In addition, you also need a glass of lukewarm water and a paper towel to clean the seeds by wiping them with a soft cloth.
- Next, spread your seeds evenly on your paper towel and cover with another paper towel or a tissue.
- Place the seeds under a bright light until you see seedlings. However, there is no need to keep it too close to avoid overheating. Make sure to change the water every day and keep the paper towel moist enough but not soaked in water. You can also spray a little bit of water on top of your seeds as well.
- When you see a white root growing from the seeds, then it indicates that the germination is in process. It will be complete when you can see two small leaves grow from each seed (approximately three to four weeks).
- Finally, transfer your adenium seedlings into individual pots and keep them watered until the plants are strong enough to be transplanted into the ground.
What is the best time to sow adenium seeds?
You should sow fresh adenium seeds during the cool season. These include fall and winter. It is better to germinate the seeds indoors because you need to control the temperature, humidity, ventilation, light exposure, and other factors which are hard to achieve outdoors. The next step will be planting them in pots or garden outside when weather condition becomes stable and more comfortable.
Best potting mix to grow adeniums
The best potting mix for plant growth contains 50 percent of soil, 25 percent of peat, and 25 percent of sand. A combination of these three components will provide your plants with proper drainage, air circulation, and water holding capacity. As a result, your plants will become stronger and healthier.
Repot adenium
You need to repot the adenium when you see its roots are coming outside of the pot. It is also helpful to repot them in the winter season because it helps to let your plants rest before they grow actively in spring. Repotting the plants during fall season is preferable as well.
It is time to transfer your adeniums into the garden when you feel that there are no more threats of frost and cold weather. Otherwise, it will be better to keep them inside until the air becomes warmer and milder.
Water adenium
It is better to water the adenium when the soil feels dry up to your first knuckle (approximately 1 inch deep). Watering once every one or two weeks is enough during the summer season. However, you also need to provide them with enough humidity and ventilation during cold weather.
Final thoughts,
Adenium is a special kind of plant which can survive in extreme climates. However, you need to provide it with enough warmth and sun exposure to produce vibrant flowers. In addition, you should follow the steps mentioned in this article when growing adenium from seeds. After all, germination is a time-consuming process where seedlings become strong and ready to be planted outside. You may also like to read this article germinating seeds in paper towel in House I love.
How to clean a suede couch with vinegar?

This is a question that many homeowners ask themselves. The reason for this is because suede couches are quite popular and it can be difficult to keep them clean. However, thanks to the latest advances in household cleaning products such as vinegar, keeping your suede couch looking great has never been easier!
Vinegar is an extremely powerful cleaning agent because it has so many uses. You can use vinegar to clean almost anything, from your suede couch to the tiles in your bathroom. If you’ve tried using soap and water in the past without much luck, try using vinegar instead. Vinegar is a far more effective cleaning agent and will get your suede couch looking great again!
How to clean a suede couch with vinegar?
We will now take a look at 5 great tips that can help you clean your suede couch.
Tip number one
Prepare the necessary cleaning materials that are required for this task. These include paper towels and vinegar in addition to any special soap or cleaners you might own. You also need a strong household cleaner such as bleach in order to remove tough stains.
Tip number two
Remove any cushions, pillows, or other removable parts from your couch before you start cleaning it. Remember that suede couches are usually double-seated, meaning there is a seat cushion on top of the actual couch base. This separates your couch into 3 different pieces, which makes cleaning everything much easier.
Tip number three
Spot test your chosen cleaning product on an area of your couch that is not visible. If you’ve never cleaned your couch with vinegar before, it’s best practice to do a small patch test first just in case there are any negative side effects. Simply apply some of the vinegar onto the fabric and wait for 5 minutes. If the fabric is not damaged in any way, you’re good to go!
Tip number four
Clean your couch with water and vinegar. This mix makes for a much more effective cleaning agent than simply using plain old water. Pour equal parts white vinegar and warm water into a spray bottle and shake it well before spraying onto your couch. If necessary, you can also soak up some of the water with paper towels.
Tip number five
Scrub your couch vigorously until stains start to lift. Be sure to use a heavy-duty cleaning sponge or brush in order to provide enough pressure needed for deep-cleaning your couch. Also, try using hot water if required as this will help dissolve dirt and stains more easily.
If some of your stains are particularly tough to get out, try using a strong household cleaner such as bleach to remove them. Just make sure to spot test the area first before you start scrubbing! However, if you do need to use bleach on your suede couch, make sure you only apply the solution to the dirty area and never on the rest of your couch. For example, if you spilled something onto a cushion or pillow, don’t make the mistake of getting bleach all over your couch!
After around 20 minutes of scrubbing with water and vinegar, as well as some light cleaning with bleach, your suede couch will start to look as good as new! With a little bit of elbow grease and the right cleaning solution, you can have your couch looking great again. All of these tips will help you clean suede couches with ease!
In the event that none of these methods work, or if your stains are too tough to remove, try hiring a professional cleaner instead. Hiring a good cleaner can save you a lot of time and effort, especially if your stains are very difficult to get out.
Though many people don’t realize it, cleaning suede couches is actually quite easy with the right household products! You just need to know what kind of cleaning solution works best on different types of fabrics. Vinegar is a great choice for cleaning suede couches as it is effective at removing stains without damaging the fabric.
You may also like to read how to clean suede couch
How to Adjust Cruiser Bike Handlebar
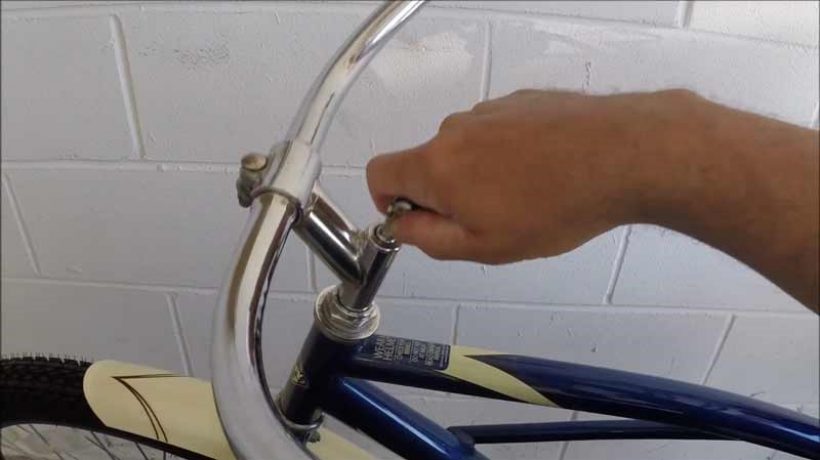
Now people so much riding with a cruiser bike. The cruiser bike is a well-fashioned multipurpose bike. But there is a common handlebar adjustment people are suffered.
So here we have discussed cruiser bike handlebar adjustment so let’s dive in.
First Adjustment
This article focuses on how to adjust your handlebars on the beach cruiser. So the part of the bike that the handlebars are attached to is called the gooseneck, which is located on the front middle part of the cruiser bike.
So, if you want the best cruiser bikes for women same process you need to do for adjustment.
There are two adjustments to bolts, one on the top and one on the front. So, the first adjustment I’m going to show you is how to raise or lower the handlebars.
Now, normally on newer bikes. It’s an Allen bolt that does this adjustment, older bikes will have a hex nut or something to that effect.
Today I’m going to use a little multi-tool that I take on bike rides with me that has a, you know, a few different Allen wrench sizes, the most popular ones, basically put your Allen wrench in, turn it counterclockwise.
Now many times you’ll see the handlebar sink like this into the head tube. Many times, they won’t though and I’ll show you why.
So basically, when you tighten up a gooseneck, it creates a wedge inside of that head tube, which makes it fit tight. Sometimes you’ll go ahead and unscrew that bolt, but that wedge stays in place.
What I recommend, if you ever see that happen is to cover that bolt with a rag and then take a hammer and give the top of that bolt a little tap.
Which will knock that wedge loose it’s at that point that you can then, you know, raise the handlebars or lower them to whatever height is comfortable for you.
Just be aware most goosenecks have hash marks or a line that you’re supposed to pay attention to. You don’t want to go above that because then it would be dangerous.
So basically, you do not want to see that line. So, in this case, our maximum would be right there.
Today I’m adjusting these handlebars to the maximum height and then I’m retired.
Finally, stand up the bike, look straight down to gooseneck, make sure it’s lined up with the bike wheel. As you can see here, that gooseneck is not lined up with our front tire. In fact, it’s pointing a little bit to the left. You want it to be straight in line with that tire. Basically, all you have to do is just loosen that top bolt up just to look.
Step around to the front of the bike put the tire firmly between your legs. Loosen that bolt just a little bit, maybe half turn, and then look straight down at that tire. Make sure that the gooseneck is lined up perfectly in line with the tire, hold onto the handlebars, and retighten it.
Hold onto the handlebars give it a good twist. If you feel that gooseneck moving at all, then you need to re-tighten it. But really if you tug on it and pull on it, it should not give or move whatsoever inside of his head tube.
Adjust the Pitch of the Handlebar
So, what we’re going to do now is adjust the pitch of the handlebar. So, what might work for me might not work for someone else. They might prefer those handlebars to be lower or much higher.
It’s just all a matter of personal preference and comfort. All right, folks, a very easy adjustment here. A lot of times you will have an Allen bolt on the front.
Just like the one back here, but this is a standard nut and bolt on this one. And I am going to use a ratchet with a half-inch socket to loosen that up.
Now you don’t have to totally loosen this bolt, just you need to back it off a few turns and you’ll see that with a little resistance, these handlebars move fairly easily.
Once it’s loose, I do recommend going around to the backside of the bike, grabbing onto the grips, you know mess around with adjustments. See what you think would be most comfortable for you.
When you get them there, come back around and then just tighten up the bolt. Now what I recommend is once you think you have that bolt tightened to where you needed to be gone around to the back of the bike you know put some weight on those handlebars crank down on them.
If these handlebars move or give it all readjust, come back around to the front re-tighten that bolt, you know, apart from a loose wheel on your bike, I’d say a loose handlebar is probably the next most dangerous thing to have.
So always make sure you got that plenty tight your cruiser bike handlebar.
Conclusion
Keep an eye out as I will have more instructional articles on the way on how to maintain your beach cruiser. Thanks, and take care and if you want to learn you can visit OutdoorXsports for more biking tips and tricks.
How does the jet engine of an airplane works?

Whether for a reason to celebrate, like a vacation to a dream destination or for a reason of need or work, during your life, you have used or will use an airplane as a method of transportation. You may panic or adore that sensation of flying that humans have pursued since the beginning of time. Still, the truth is that more than once you have wondered how the jet engine makes these fascinating machines work that are capable of transporting ourselves from one place on the globe to another in a short period.
How does the jet engine of an airplane works?
Being a purist, the real question would be how an airplane jet engine works. And it is that the commercial airplane you know, yes, the one in which you fight not to check your suitcase, works in a vast majority of cases through a jet engine. Sounds interesting? Well, this is just beginning. Keep reading and today. We will explain how we were able to achieve the dream of the Wright brothers: to fly.
Why does an airplane fly?
The aeronautical sector is one of the human activities where more rigor and rigor are required when manufacturing the parts of an airplane. Still, it is so complex the reason why such a heavy machine is capable of taking flight? The reality is that it is, but, like everything in life, it has a rational explanation and is simple.
Imagine that we take a balloon filled with air to which we untie the knot. What’s the score? That the air trapped inside the balloon seeks to exit abruptly through the open end of the balloon so that our colored balloon will shoot out in any direction. Well, yes, dear reader, this is how an airplane jet engine works, by the impulse of a stream of air that comes out through the end of the engine.
By now, you may have realized that it is a little more complex than this and that if we want to know why an airplane flies, we have to dig a little deeper. Here we go.
The big blocks of a jet engine
A conventional jet engine is divided into four major blocks: intake, compression, combustion, and exhaust.
The Big Four Parts of an Aircraft Engine
At the front (intake), a large propeller absorbs the air and drives it both inside the engine and outside, surrounding the core of the turbine. It is, through this core, located, how it could be otherwise, right in the center of the engine, where the air moves towards the compressor.
Do you remember our beloved balloon? Well, just like when you press it, the air that reaches the compression zone is squeezed brutally, passing to the combustion chamber, where it mixes with the engine fuel. Imagine a great stream of hot air that expands colossally in a sealed chamber, creating a high-speed jet projected towards the rear of an airplane engine as it takes off, never better said, forward.
The higher the speed, the greater the thrust force of the motor. At that time, where the temperature of our jet engine reaches 1,500 degrees Celsius, almost nothing, right? The parts show the quality and demand to which they are subjected. Nothing can fail.
The final part of the jet engine of an airplane
The jet of hot air also turns the aircraft’s turbine, connected to the front of the engine by a shaft. As if it were a windmill. Think that each blade of this high-pressure turbine pushes with a force similar to a Formula 1 car.
Excess hot air comes out at high speed from the rear of the engine (exhaust), generating the energy necessary for the plane to reach its destination on time. This is how an airplane flies.
You may also like to read, Educational innovation: 7 technology trends for 2020-2030
Bike Geometry Explained to Measure Right Bike Size

Today’s article is all about bike fit. There’s a ton of trends going on in the bike industry. Since biking, isn’t a one size fits all sport. Some of these trends might be good for some riders.
They might not be good for others. So, I have a few experiments plan today that involve this scale, this whiteboard behind me, and a few other things that will help you demystify some of the terms being thrown around.
There is I’ll help you figure out what’s best for your particular riding style and how these geometry changes affect hardtail choice versus suspension.
Quick Overview
Let’s give a quick overview of some of the terms you use to size bikes nowadays and talk about why some of these changes happen.
If you go back to early mountain bike days, the two ways that you would size a mountain bike were off of a seat tube and off of your top tube, mountain bikes used to be a pretty traditional diamond design and the top tubes were really tall.
People want to know how to measure a bike and here we have gathered some quick useful tips to get the right size.
So, you needed to make sure that you had enough room to stand over the bike. And then you also wanted to know the distance from your seat tube to your head tube.
That would determine the amount of room that you had when you sat on the bike and pedal that down the trail. Flash-forward a number of years.
riders are riding more aggressively refer trails than ever before. They started wanting longer travel. They started wanting bigger wheels and when you have a slack seat tube, long travel, there’s not a lot of room for this big giant wheel to move and have a room without hitting the frame.
So, the most common way to size a bike nowadays is based on reach. Reach is calculated by drawing a vertical line through your cranks and then taking the horizontal measurement from there to the center of your head tube.
If you use your reach, your stem length, and your stack, that’s the vertical measurement from the top of your head tube to your cranks.
If you combine those three things, that’s your cockpit length. Those three numbers will have a pretty big effect on how the bike feels when you’re riding down the trail, whether you’re sitting or standing and riding technical terrain or going super.
There are some terminologies. Now let’s head out on the trail and see how this stuff affects you in the real world.
Seat Tub
So, let’s talk about some of the pros and cons of a real steep seat angle, and a longer each versus a short reach. The number one benefit for a bike with a steep C tube and a long reach is its ability to climb.
You sit in a much more central position on the bike and the days of sitting on the noses saddle hunching over the bars. As riders started going faster and faster steer to angle started slacking out a lot, which put the front wheel much further in front of you.
When you came into a turn, it was really easy to push the front wheel because you didn’t have as much weight on it as you used to.
So, having a longer reach puts more weight on the front tire and allows you to get that traction that you need. Just like anything, every design is going to have pros and it’s going to have cons.
Long Reach Bikes
So, let’s talk about what I perceive to be some of the. Negative points of long reach bikes. First off, if you live somewhere where trails are really tight and twisty, a long-reach bike is just going to be a bigger bike and it’s going to be more of a handful to take through those trails.
So, you’re going to want to give some consideration to how long you want your bike to be. The second thing is something that I hold near and dear to me and that’s the ability to bunny hop a bicycle.
When the reach is too long, the bike could be really hard to bunny hop. And the last negative thing about a long-reach bike, similar to riding singletrack.
It’s longer so doing little jibs and doing one eighties and stuff like that; it’s just going to be a little bit more of a handful on a long reach bike because it’s just more bike to move around.
That’s my quick trail overview. Let’s head back into the shop and dive into it. Full suspension bike pretty much goes right in line with most manufacturers’ size charts nowadays.
But the hardtail is quite a bit smaller when I built my hardtail. Last year, I tried to match all the numbers of my suspension.
To my heart until the reach, the stack. I tried to make them all match on paper. And when I got on those bikes, they felt completely different when you got out on the trail and rode them.
It got me thinking a hardtail is a rigid frame that behaves one way and a suspension bike is a dynamic piece of equipment with a pivot.
That moves everything around and it behaves completely differently. So, I’m gonna use this whiteboard behind me to demonstrate just how that happens.
That’s just with me sitting on it with a proper pre-load I’m going to try and do a seat bounce now and see if I can get it to go even further.
So, you can see before you’re going to preload it. Or do a bunny hop. You’re bringing in your reach quite a bit. This is a pretty big distance from here to here.
If you want to understand how to measure bike size then you need to realize the whole thing.
Suspension
Now you definitely have front travel compression, but on a suspension bike, when you do that, the bike usually goes down with the rear suspension and the front suspension together, or even on a downhill.
you’re definitely sagging in your rear suspension and front suspension. So, these measurements stay a lot more consistent.
Now I’m going to grab my hardtail and show you the difference between the suspension bike and the hardtail and why a hardtail will always ride, which means feel longer than a suspension bike.
Now it’s time for me to do the same experiment on my hardtail. I’m going to take the marker and put it on top of my grip.
Well, it went from here to here, so I kind of poke through right there, but you can see it arcs from here to here.
That’s about the same distance as the other bike shortens this bike lengthens. So that was actually a pretty interesting experiment for me because I saw that my hardtail has the ability to get as long as my suspension bike has to get short.
Totally makes sense because my suspension bike has the ability to shorten 20 millimeters. And my hardtail has the ability to lengthen 20 millimeters.
That’s why when I get on my hardtail, it almost feels as similar to my suspension bike ready for another experiment. I said I had a scale for something.
talked about bike geometry, we did some experiments and I showed you how sizing for a suspension bike is going to be completely different than a hardtail.
So where does that leave us size charts for bikes are pretty useful, but another great way to figure out what size bike is going to be good for you is to use your rad measurement.
And if you go to a YouTube channel that I’ll link below-called joy. They’ve just done a couple of videos on figuring out your rad measurement.
It’s basically your cockpit on your bike. My suspension bike falls right within the guidelines of what they’re telling you. And I think it’s a great way to measure bikes for hardtails.
My bike is quite a bit shorter and I think these experiments showed you why, as I said, Mountain biking is not a one size fits all sport.
If you’re looking to ride wide open trails and go as fast as possible, those longer bikes are going to give you a ton of stability and they’ll probably work out awesome for you.
But if you’re an east coaster like myself and you want to ride more tight technical trails, do lots of jumping and stuff like that.
When you take into consideration that a hardtail only gets longer like you. It’s always better to lean on the side of a slightly smaller bike. So, there you have it. This video is a ton of fun to make.
Conclusion
Hopefully enjoyed reading the post and as much as I’ve enjoyed writing it. If you’re new to the website please consider bookmark the web blog and want to know more you can go OutdoorXsports for more biking tips and tricks.
How to True Dirt Bike Wheel in Fastest Way

What I’m going to describe to you today is how to true your dirt bike wheel on your dirt bike with no specialty alignment tools or truing stand.
First Step
All you’re going to need is your spoke wrench, its parents, zip ties, and masking tape. I’ll go ahead and show you how it’s done.
So I have the wheel mattered up on the bike. Now what I have done is I’ve taken a zip tie that is in contrast color to the wheel.
So in this case, a clear zip tie on a black rim and I have taped it to the swingarm and I’ve placed it about an eighth of an inch from the rim and with that what you can do is you can spin the wheel and how to true a bike wheel.
You can spin the wheel and see where you know and the close spots and the far spots are essential.
So as you turned the wheel you noticed that about here the wheel starts to get very close to the zip tie as you continue to turn it and when I get to about here and noticed that the wheel begins.
Then you are going to get the front wheel on the bike and get that one trued up and show you how it’s done.
So what I’m going to illustrate here for you is the side-to-side movement that the wheel has right now. If I turn this wheel for you can see that there is extensive side-to-side movement.
Many of the wheels are not true. Now you could go buy a wheel standoff Rocky Mountain ATV or Harbor freight for 50 to 80 dollars but you can actually true the wheel with it just on the bike.
I’ll show you here and what you need to do is I taped that clear zip tie right there on the Fort cover you have to spaced off about a millimeter off the wheel.
So as I turned the wheel and circular motion and you need to see the side to side motion. So I’ve been turning the wheel over and over to get a good feel for it.
What I’ve noticed is that the high spot right about here. So, what I’m going to do is I want to loosen this boat this folk and this spoke and I’m going to tighten the folk in this boat to pull the wheel to my left.
Now I’m going to tighten up the spokes. On the other side, we’ll do about a quarter to a half a turn on all of them.
To pull the wheel towards the right-hand fork, we’ll deal with this guy as well.
Sometimes you will notice that loosening the spokes on the other side and we’ll also loosen the tension on the spokes and its need to be tightened.
So you need to do a little bit more and why don’t we go ahead and do this guy just for good measure. Now let’s go ahead and reevaluate this and go ahead and turn the wheel.
Second Step
So that has fixed it a ton, but I have another high spot about right here that I’m going to go ahead and fit as well.
So like I said before or we will loosen three or four folks on this site to give us some room to tighten on the other side. Want to loosen up tight and then we will go around to this other side and tight half turn and three-quarters of a turn.
If you’re feeling adventurous. See what I’m talking about here. We’ll get this guy all brake tightened up and snug.
I think that’s a good place and let’s go ahead and reevaluate as well again that is looking so much better, but now I noticed that we have a low spot right about here.
So, I’m going to loosen on this side and tightened for three or four spokes on this side to pull the wheel to the right and I think we should be good to go after that point.
Take a look here that is so much better. We still have a very, very little amount of movement, but I’m not worried about that. That is so dang close.
As I turned the wheel to fix them up and down motion of the wheel. I noticed I have a low spot about right here. So what we’re going to go ahead and do is loosen these spokes on this side.
So this one probably rotates at 180 degrees. Tighten those four spokes and That’ll suck the wheel.
That’ll pull the wheel down and eliminate this low spot that we have right here four spokes.
Loosen it up about a half and do this one and probably this right here and we’ll flip 180 degrees. It’s about right here.
We’ll tighten every single one of these is about half to three-quarters of a time this guy wasn’t even tight this guy as well.
Sometimes you’re going to find that as the wheel adjusts the spokes will and once again become loose. It’s not the end of the world though. You can continue to be true. The wheel has these adjust.
We will turn the wheel again to measure our up and down movement that fixed it so well but as I do it again and noticed that we have another low spot about right here in this area right here and so once again you will loosen a few spokes.
Loosen this guy too and we are going to go 180 degrees. The other side tighten these bad boys up can have turned and If there are any snug fit this guy as well.
It’s kind of nice and sniped out. Okay, let’s go ahead and throw it again in a circle now.
Well there you have it all you need is your spoke wrench and a zip tie, and you can get your wheels trued up right here in your garage.
No need to take the bike out to the mechanic, spent all kinds of money to have it done.
Conclusion
If you liked this article so go ahead and I’ll be putting these articles out for you. That way you can stay out on the trail and not be in the garage, wrenching on the bike and if you want to learn more you can visit OutdoorXsports for details.
What Bedroom light fixtures to use to illuminate your apartment better?

If you are on the road to finding a new place to live, bedroom light fixtures are undoubtedly a key starting point. The lighting of a house or apartment directly modifies the environment and its aesthetics. Light adds personality and brightness to an environment and highlights the decoration of a home.
Bedroom light fixtures to illuminate your apartment?
When visiting the different apartments for sale, you can begin to imagine bedroom light fixtures. The light you would place in each environment according to the need and the personal touch.
The kitchen
The ideal combo for the kitchen is one that carefully balances artificial light with natural light. It must be used intelligently and not heat. The uses will be directly related to the types of artifacts to choose from.
To have an even and precise light in this area of the house, recessed or hanging spotlights or tubes with a good focal aperture are suggested. If possible, with LED lights, they are an advantage not only for their low energy consumption. But also for their long duration. Useful life calculated in more than 50 thousand hours.
If the kitchen is large and has a bar, breakfast bar, or dining room, bell or pendant lamps with warm light can be used. For this reason, today, in the kitchen, there are individual switches associated with each installed light. A small directional light can be the perfect device to illuminate various highlight decorations if you are very detailed.
Bathroom
The classic lighting on the mirror is usually an overhead light or a viable alternative is the placement of two sidelights. It will also depend on the use of the mirror since, for example, adequate light is necessary for good makeup.
To expand the lighting, you can not only use a main focus on the ceiling, but several depending on personal taste. When choosing bathroom lights, it is important to check the protection index since steam and excess heat can damage them.
The bedrooms
Ideally, adult bedrooms are the main lighting that has general lighting to cover the entire space. The dimmer lights are an option. They can be ceiling or pendant using a dimmer to modify the intensity of the light.
There are also table lamps or nightstands with their own lighting, of which there are all types and values. Models with extendable and flexible arms can be chosen. In the case of having a dressing room, internal lighting is essential.
On the other hand, for the boys, the possibility of adding design and creativity to the main light is open, whether it is a ceiling or pendant. If you have a desk, you cannot miss a table lamp and a nightstand according to the boys’ age.
The room corners
One of the most common recommendations is that the home’s lighting is flexible to different activities and times. The general light with not very intense ceiling lamps is a classic option. It can also be combined with a floor or table lamp at strategic points such as next to armchairs or reading corners.
Here it is also possible to modify the atmosphere to use lamps with dimmers. The choice of warm light will provide a more intimate atmosphere, while white light will be a great ally for studying, working, or reading.
Mix with general lights
It does not necessarily have to be a ceiling, with a functional one, wall lights and floor-standing models, and an ambient one with table lamps. This diversity will rarely be turned on at the same time. It allows creating differentiated areas according to the lighting needs of the activity that takes place in each one.
Closet
In addition, by giving prominence to the wardrobe, they will help you get dressed in the morning. Without being dazzled, find everything the first time. The ideal is to place a spotlight on each body and operate them all with the same switch, as in this Ikea bedroom. If it is a separate dressing room, a powerful ceiling lamp will suffice.
The master bedroom should be a relaxed and welcoming space that invites you to rest. For this reason, choose lamps with shades that emit a warm and diffused light, medium power in the case of point ones, and LED in-ceiling ones.
As important as the type of bedroom light fixtures is the chosen lamp. Thus, the Duo light achieves a double lighting effect. The central diffuser with LED light prevents any glare and offers a uniform light. On the other, the perimeter light bathes the wooden surface, providing an unexpected warmth.
You may also like to read, How To Empty and Clean Shark Vacuum Dust Container
How to Convert Mountain to Beach Cruiser Bicycle
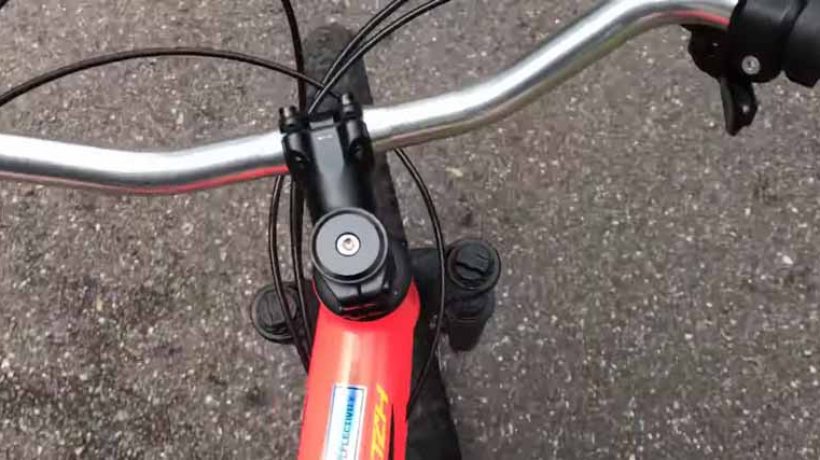
This article is all about how to convert a mountain to a beach cruiser and I put them side by side here, so you can kind of see the differences.
There are lots of differences, the frame is different and the geometry is different and so and it’s true between a cruiser and a mountain bike, but what would you really rather have and what’s better for resale and what gives you more features.
Shape
Let’s look at the beach cruiser kind of shape here and why it works so that and people can sit down, put their feet on the ground.
There’s actually extra space and more of a lean on that seat tube that leans towards the back. So your distance between the seat and down to the pedals, see that distance will be greater.
So you’re actually leaning kind of back and your legs are going forward more like a driving position in a car instead of as on a mountain bike or you’re more straight up and down.
The other thing is the handlebars come way back because you’re leaning back and make up for that offset so those are kind of the differences.
Maybe you don’t want to buy a beach-type best cruiser bikes because they’re super expensive, so three easy steps throw on a kickstand, pop that baby in most mountain bikes, come with the little hole there so you can put it on.
A lot of people have their kickstands way too low so It’s really funny and it’s really easy to adjust them and depending on which one you buy this one’s from but super cheap and easily adjustable.
So you want to adjust that. So your bike is just leaning a little bit, not leaning a ton, um, which will put too much weight on the kickstand.
So those differences in geometry between the two bikes and can make a big difference, but let’s not make it impossible to here and we can still make a comfortable cruiser bike that has disc brake suspension, a good frame.
That’s lightweight that has 1800 needs or whatever you need with a mountain bike versus a cruiser which only has usually three speeds and sprays lane.
So this is a seat tube and a seat adjustment. I just went and bought a bigger, wider seat.
It was causing a kind of shoulder pain. So, it mostly seats you know almost all seats are standardized and they’ll fit.
Seat Post
Every other seat post, unless you get the kind which I’ll show you and this one comes with both parts that have a hole in it for one of those seat posts that it goes straight up and doesn’t have the clamp type, which I’ll be putting on.
Now it’s just two different kinds in this seat that can work with either. You just take that circled clamp, post clamp off, and just trash those parts and use the method that you already have on your seat posts.
So, I forgot to mention this bike is called a specialized pitch. It’s a women’s version, but I honestly couldn’t tell writing myself, you wouldn’t know that the pink color, which is pretty awesome.
Anyway, super reflective now on a beach cruiser bike, and the angle of the seat matters and so usually you want to have that more up because you’re leaning your feet.
You’re leaning back more and a flat seat angle horizontal with the ground is usually good for mountain bike per beach cruiser and you want to tilt it up a little.
Then you can also slide the seat forward and back on and in respect to that, see you posting, you want to slide that as far back as he can just get a little, little more legroom there.
They ended up being a little bit smaller than I would have liked. I would have liked him like a more traditional beach cruiser bike.
These are some kinds of cruiser bike comparisons with the lengthier and the different angles.
It’s really hard to buy bars online. I’ll give you a link below to some good ones that I’ve seen, but don’t be afraid that your bars won’t fit in terms of diameters.
Diameter
All beach cruiser bars are generally one-inch bike diameter at the stem and you see these bring your arms back a little more into tilt, inwards to keep your wrist from being in an uncomfortable position.
You may be seen in this bike that I actually do have some spare room here with my cables and that’s one thing you want to check before you modify.
Make sure you’ve got some extra cable length there. Then you need to take a little test ride and I would say I’ve only got one hand on the handle.
So, unscrew the top cap in the side of the clamps, I would say there’s a little cap with the screw, the bolt, excuse me, pop this baby off and you don’t need to adjust anything there as far as the bike brakes or anything now.
Your bike may get a little wobbly here on the little top dust shield kind of came up with not to push that back down.
There’s one thing you want to make sure when you put some like this one, or when you put a new stem on.
You want to make sure your headset is nice and tight, and those bearings are kind of pressed and compressed everything compressed.
So first I need to check here and see if I need any rings underneath. There needs to be a little space between that dark silver. Which is the S the, um, steer tube from the forks and the middle portion here.
You’ll be all wobbly and it’ll be terrible. You’ll probably ruin your bearings and everything and it’s slide this backdown.
I put one ring in between, down there so that I can maintain that gap. And now you see this is adjustable and it can raise it up as much or as you want.
Try to put some rings in there and luckily this little adapter came with those rings and it came with an extra-long bolt because the point of that bolt is you put that on first and it sucks everything together and clamps it uptight.
Before you start bolting the sides together to get that side clamp force if you want to do this first.
Then you will need to compress everything, make it nice and tight. So your steering is good to go. I’m not going to give you any torque specs on anything.
I don’t have a torque wrench for, for this, um, for Alan’s and I actually, you know, something I should get, but on here it says six Newton meters for the side, bolts are going to start at the bottom one, two, three, four.
Once I have those tightened up, making sure they align it with my front wheel, then I’ll be ready to go for another test ride.
So you might say, oh, okay. It looks a little weird. It looks a little popped up in the front there, but, um, when you get used to it and you, you hop on there and you feel so comfortable in your ride and you get a little suspension there, you really, really will enjoy converting your mountain bike into a trail cruiser.
Conclusion
Maybe not a beach cruiser, but certainly we’ll be taking this on the hardpack sand at the beach, but so much more comfortable.
Check OutdoorXsports if you want to learn more biking tips and tricks.
What is the most popular color to paint a bathroom?
Are you thinking of renovating the bathroom with little money and in a fast and simple way? Paint is a great resource to give your bathroom a new look. But what is the best color to paint the bathroom? When choosing, you must take into account a number of factors such as the size of the room, lighting, and furniture. Here we show you the 8 colors to paint the bathroom best work. It should be noted that when we refer to bathroom walls we are not only talking about paint but also coatings.
Colors to paint the bathroom: light blue
If you want to create a relaxing atmosphere in the bathroom, light blue is a safe bet. This color transmits serenity, calm, peace, and order … Combined with white subway tiles it is perfect, creating a clean, bright and refreshing environment. Also, keep in mind that blue bathrooms are trending.
White: synonymous with cleanliness
The white is a classic bath especially if it is small and not very bright. It has the ability to provide light and visually expand spaces. It is a timeless color that never goes out of style. It is synonymous with cleanliness, calm, and relaxation. In Chinese Feng Shui philosophy, white has a healing, bactericidal and disinfecting power, which transmits a charge of energy and shine.
If you want to add a touch of color, do it with textiles (towels or bath mats, for example) and decorative details such as sheets.
Black and white, a winning combination
The black and white pairing is always a safe bet to decorate any room, and the bathroom is no exception. This combination is synonymous with style and elegance. It offers a lot of possibilities adapting to most decorative styles, such as industrial, rustic, Nordic, or modern environments. Here you can see more black and white bathroom ideas.
Green: the color of harmony
One way to give life to the bathroom is through colors. Green is the color of harmony, balance, rest, confidence, and peace. It is suitable for spaces where we want to relax, such as the bathroom. The apple green looks good with white, at the same time the green water is ideal for a touch of Shabby Chic. The truth is that green bathrooms are always a success.
Gray: neutral color
Gray is a neutral color resulting from the combination of black and white. It transmits elegance and good taste. It is ideal to get a zen bath. With gray, it is always right as it combines well with most colors. It is perfect as a base, and we can easily complement it with more vivid tones.
The bathroom in yellow
Yellow is the color of the sun and is associated with creativity and intelligence. Get happy and welcoming environments. It has been one of the trend colors for several seasons. Like white and light gray, this color is a great ally to bring light to any room in the house, while making spaces look larger. If you want your bathroom to exude vitality and joy, bet on this color.
Bet on the color orange
The Orange is excellent to give life to the bathroom. It is a vibrant color that is associated with joy, enthusiasm, creativity, and happiness. However, being so powerful, you have to be careful when applying it. It’s a great option to use as an accent color, especially if you follow the 60-30-10 color rule.
Another way to use orange in the bathroom can be through contrast. Yes, here you can see ideas to create a contrast wall in the bathroom. And it is that a wall can be enough to add color to this room. If you combine it with white the result will be perfect to create a bright and lively environment.
Pink bathroom: bright, romantic, and cozy
Pink is a cheerful and optimistic, purifying and harmonious color. It is associated with charm, delicacy, and the feminine. It is a chromatic range that transmits calm and frees restlessness. If you want to give it a sophisticated and chic touch, we recommend you go for this color.
You may also love to read this article, Redecorate Your Home with Traditional Rugs
How To Empty and Clean Shark Vacuum Dust Container

Here I’ve got the shark rocket pro vacuum cleaner here, and I’ll show you how to empty the container and how to complete maintenance. So, follow our instructions step by step and solve your problem.
Open the Bin
So, emptiness is really easy and it is bagless right, but that doesn’t mean there are no filters there and because it’s not bagless, there are filters It has to be cleaned.
It really should be, unless you don’t care about the performance or anything else like that. So let me show you how to empty it real quick and then take it a step further than that.
Empty unit is really easy because there is you have a trap door and you have to need to disconnect from the pipe.
So, you just got the motor part here where the container, there’s a little latch, just throw on the dustbin. You know you make sure it’s empty.
Remove Dust
This one was already been emptied and I’ll sometimes this one here and built up a little bit of hair and stuff here.
If you have dogs. So, make sure that’s clear, terrible. I close it back up and you’re ready to reuse it, but every couple of weeks.
So carefully take the best shark vacuum for pet hair and that’s so helpful for dust cleaning.
I just, every two or three weeks, you really need to wash the containers. Let me show you how to do that. Let me see here you know, container parts over here and this one here similar and different at the same time.
So, there is a latch for the little hatch right on the other side, there’s a button right side, which you push that and it’ll let you release the whole container.
There is also a motor part where I said at the side, there is another filter there, which I’ll show you in a minute or any back the container.
So, the container, we had a couple of intake filters right here and it’s a two-piece system. Don’t really see much there. And on this one here, which is pure foam, this is 30.
You should be washed all of its dirt and debris. Let’s get it in a better light. Now you can see it. Okay. And the whole thing is just super dusty.
Use Soapy Water
So, what you’re going to do is just wash it and some soapy water. Now this one has the trap door, which makes it easier to do a quick dump while you’re vacuuming.
But when it comes to washing this out, it’s more difficult than sink it. Warm, soapy water one water, and a little bit of Dawn.
So, nothing crazy. I want any kind of corrosive soaps or anything. Crazy foam filters in. We’re going to open this up and drop that in as well. So, we’re just going to wash this really well.
Then it rents it with some clean water and that’s really all there is to it. At this point in the manufacturer says it needs at least 24 hours to dry.
And a lot of times I think that manufacturer’s instructions are way overkill, but this one really isn’t, you really need at least that much time.
So, I got two filter pieces there. I don’t I’m squeezing them out or my trash to make sure that there is squeezed out as convenient and laying them out here on my counter was the paper’s house.
Then on the container itself, water can get in between these couple pieces here. So you want to shake it out carefully.
But get it kind of shake it out and I’m going to set it up like this. And then in a few hours, I’m going to actually turn it a different direction so it can drain air out as good as possible.
There really just take that full 24 hours to try out if not just a hair more, not kidding here. Do you want to dry it before you put it back together?
I know it seems inconvenient, but that’s what you get. When you get rid of the bags, you got, uh, a little more maintenance to take care of and speaking a little more maintenance.
There’s still one more filter to go. You’re like, wait, wait, wait. I got the whole; the whole cartridge container thing is there.
These home filters were intake filters and we need an exhaust filter now and this one’s really easy. You get to, so you got the shark right here.
You got the inside here, the center. Your kind of just going to grab it and pull it straight out and there you go. There’s the exhaust with their name.
You can wash this in the soapy water you just did there or you can take this to a compressor and blow it out.
If you are maintaining your vacuum well and emptying it wherever early and washing out the container, like every two to three weeks and which for me is like every day.
Some people vacuum the house around their kids back in the house very thoroughly once a week, and I’ve got pets and stuff like that.
So, I’ve got a lot of dirt and a lot of hair, so it gets very dirty. So, about every third week I wash it and this state is pretty clean but if you’re waiting much longer to do this, this is going to start really kicking up. and you’re like, why do you even have this exhaust filter in the first place?
Well, you don’t want to run the vacuum cleaner and have it bullying dust in your house. Do you? None at all. That’s what we have all these extra filters anyways.
Conclusion
Thanks for visiting my web blog and I am feeling appreciate it. If you wouldn’t mind taking a moment to like the post
If you want to learn more check our vacuuming blog and there, is you can find tons of information.
Redecorate Your Home with Traditional Rugs

It is not easy to deal with home improvements nowadays. Most operations are very costly, and you may even need to get a new credit line just for this reason only. However, you should know that there are ways of making your home look great without spending so much. One such solution is decorating your house with traditional rugs.
Combinations of styles
It is very important to keep in mind that there are traditional designs that can work beautifully with more modern setups. For instance, if you are thinking about purchasing an Afghan rug, the straight lines featured by its design will work great with any contemporary design already existing in your room. You may have to learn a thing or two about traditional rugs, but it will be worth the time spent doing so, because you will be able to combine some great styles in just one, without a problem.
Also, if you are aiming for a comfortable look in your rooms, your best choices are oriental rugs, which are quite sumptuous and also very comfy. Floral designs should not be overlooked, either, as they are, as well, great choices for combining styles.
Great
colors one thing you need to know about these rugs is that they come in many different, rich colors that will add a more exquisite feel to your room. Of course, you will have to keep in mind what kind of color palette you already have covered in your rooms, so that the new rug will fit as well.
The best thing you can do in this respect is to write down a few color combinations, so you can easily know what to look for.
For wall hanging
Some people prefer hanging their rugs on the walls, especially if they feature traditional motifs. Something neutral like white or cream is a great choice for rugs you intend to hang on walls. However, if you are a more adventurous type, you can choose one wall to make it the canvas for your fashion statement. Traditional rugs in darker colors can make for an enriched experience for anyone coming to see the room.
Rugs as a focal point in a room
To ensure that the design of your rooms does not become too boring, it is a good idea to choose a focal point. This can easily be represented by a great-looking rug, as it covers most of the room and it is simply easy to notice by anyone.
Choose colors with care. With the rug being the focal point of the room, you will have to go a bit further when it comes to picking the right colors. Oriental rugs, and not only, are a great recommendation.
You may also like to read, minecraft sea lantern
How to delete bookmark

Saving a web page’s address is known as Bookmark. There are different types of browser and every browser have this feature. To delete a bookmark, users have to add at least one web page as a bookmark. Though deleting bookmark isn’t so difficult but the process isn’t also the same for every device and browser.
Following the process, you can delete a single bookmark or collection of bookmarks from mention browser below
Delete Bookmark in Chrome
Follow the following steps and easily delete a bookmark from PC
Step1: Open the chrome browser
Step2: Right-click on the three dots (these dots located at the rightmost of the upper corner where three dots are horizontally located)
Step3: Now click on the Bookmarks
Step4: Place the cursor on the single bookmark or collection of bookmarks which one you want to delete
Step5: After placing the cursor, now click on the right
Step6: A list will show after clicking on right, now click on the “Delete” option
Delete Bookmark in Safari
Step1: Open the Safari browser
Step2: Click on the “Bookmark” from the top menu
Step3: Click on the “Edit Bookmarks”
Step4: Now Select any bookmarks or collections
Step5: Right Click and select Delete
Delete Bookmark in Firefox
Step1: Open the bookmarked page which one you want to delete
Step2: Now click the star symbol in the address bar and the “Edit This Bookmark” pop-up window will be showed.
Step3: Click on the “Remove Bookmark” button
Or
Step1: Click the Library button
Step2: Select the Bookmarks
Step3: Place the cursor on Manage Bookmarks and click on it
Step4: Now select one or more bookmarks to delete
Step5: Click on Right and select Delete
Delete Bookmark in Microsoft Edge
Step1: Start the Microsoft Edge browser
Step2: Click on the Hub icon (three lines symbol)
Step3: Then click on the star symbol Favorites
Step4: Right Click on the bookmark which one you want to delete
Step5: Now Click on the Delete
Delete a bookmark from android phone
Step1: Start the Chrome browser
Step2: Click on the Menu (vertical three dots) for options
Step3: Now click on the Bookmarks
Step4: Select one or more bookmarks
Step5: After Selection, now select the Delete command
Delete from Safari browser
Step1: Open the Safari browser
Step2: Select the bookmark icon (Book symbol)
Step3: Tab the bookmark which one you want to delete
Step4: A pop-up window will be opened
Step5: Click on the Delete
Delete from Chrome browser
Step1: Open the Chrome browser on iPhone
Step2: Click on the More (three dots at the right lower corner)
Step3: Select Bookmarks
Step4: Tab on the bookmark which one you want to delete
Step5: Now click on the Delete option
What are Edtech and the future of education

Education has remained relatively the same already more than a century and technology has come to change this and very quickly. So what exactly is tech education? Or among other words, what is Edtech?
7 tools to simplify distance learning

In all this, some tools are very useful to me. So I’m taking the time today to share them with you. I am no expert in the field of distance education. I hope all the same that some little tips will lighten your workload or allow you to reach your students more easily.
# 1 Screencastify
or The application that allows me to film my lessons
I film my lessons using Screencastify. This application for Google Chrome films my screen (where I display a presentation or a document) while I explain the material. I also use it to create tutorials to help my students use technological tools they are less familiar with.
# 2 Google Classroom
All my students have a school account with Google, so we have access to a variety of tools. Google Classroom has been a virtual schoolbag for my students since the start of the year. This is the starting point for my teaching since I am no longer in class. I post the list of work for the week, my explanatory videos, my lessons, the roadmaps. All assignments are assigned and collected on Google Classroom.
# 3 Google Docs
I use documents ( Google Docs) for the majority of the work. Instructions often include links to additional explanations (e.g. an explanation on Alloprof), other documents (e.g. a sample text), or a video (e.g. explaining the topic or who will fuel the discussion). In Google Classroom, you can create a copy of a document per student in which they can write directly when assigning an assignment. This function is fantastic.
# 4 Google Form
Want to see if your students have understood a concept? The Google form ( Google Forms) is the perfect tool, especially since it can correct itself. By teaching at a distance, it is more difficult to tell if a student has understood. What we can see in the eyes of a student, or in his posture, we do not see through a screen. Often it takes me a week to realize it. By assigning a short form on a regular basis, I can see where my students are.
# 5 Google presentation
Several of my units are mounted in the form of presentations ( Google Slides), with links to other documents, much like I described with Google docs. I place my lessons or my information in chronological order and then film my explanations with Screencastify going through the slides. I am posting the Google presentation on Classroom for the students to have access to.
# 6 Google Meet
I organize one to two video meetings a week with Google Meet to answer students’ questions and give additional explanations per week. It is not obvious and my internet connection is not the best. We manage to talk to each other, ask questions and keep in touch. I even administered evaluations that had been missed due to absence before leaving by videoconference. I did a short lesson with the Jamboard app, which allowed me to write on a live whiteboard. However, I must say that this is probably the part of my job that I find the most difficult at the moment. Managing student behavior from a distance is not always easy,
In short … The more time passes, the more the students forget their good work habits.
The more time passes, the more I forget the sound of their voices or the expressions on their faces.
The more time passes, the less motivated students (and teachers) are.
But despite everything, I believe that this situation is better than nothing. I would not have wanted the school year to be canceled, for the learning made since the start of the second stage to be forgotten, and for my students to spend three, six, or even ten months without school.
10 tech tools teachers can use to bring their virtual classroom to life

Teachers and students have used some form of technology to facilitate learning in recent years, but who knew they would be entirely dependent on it for the rest of the school year? Given the continuing health crisis afflicting all facets of life, including school, teachers are forced to teach their students virtually, in order to respect social distancing.
Distance education, what advantages and what disadvantages?

In the current health, scenario experienced, ensuring flexible and quality pedagogical continuity is a key subject in order to counter the risks of dropping out of school and to allow everyone the right to learn.
5 advantages of using technology in education

At a time when new generations are digital natives, incorporating technology into education brings a series of benefits that help improve efficiency and productivity in the classroom, as well as increase the interest of girls, boys, and adolescents in academic activities.
Educational tools to organize create and manage teaching work

Managing time in and out of the classroom is essential so that teachers can carry out all pending tasks or prepare their lessons well in advance. We propose a total of 20 applications and online tools to quickly create presentations. Help prepare classes and organize material in a virtual space, among others.
Technological trends in education

With each new year, there are new educational challenges to which we must know how to adapt. In recent years, innovation in the sector has been based on technological advances in order to amplify education, propose new methodologies that help both the learning of the students and the work of the teacher; and achieve a more transversal diffusion. It is what we know by E-Learning.
The digital age, education, and work: details of a transformation

Currently, technological advances have influenced practically all levels of our daily lives. The technological revolution is evident in our daily lives to the point that not a day goes by without us being in contact with a technological device. Thus, the workplace and education have not been exempt from having technological influences.
Impact and opportunities of educational technology during the pandemic

Some may say that 2020 is the year of educational technology. The compulsory closures of colleges and universities pushed most institutions to pay for education through remote learning.
To achieve this, they all turned to educational innovations such as video conferencing tools and online learning management software. Likewise, other digital solutions to keep education afloat.
Educational innovation: 7 technology trends for 2020-2030

Information and Communication Technologies (ICT) have played a prominent and sustained role in educational innovation. In the last decades, its impact is reflected, mainly, in the evolution of educational modalities, tools, and platforms.


-

Why Does My Charger Keep Going on and Off?
16 March, 2024 -

How to drive golf ball
02 March, 2024 -

How to Open Your Garage Door Manually
02 March, 2024 -

How to Measure Women’s Bike Frame Size: Unlock the Perfect Fit
29 February, 2024 -

How Do You Pull a Tree With a Rope: Uncover the Secrets of Tree Removal
28 February, 2024 -

Boost Your Skills and Confidence: What Does Skateboarding Help You With
28 February, 2024 -

12 Ways to Learn Difficult Subjects Quickly and Easily
27 February, 2024